
Settings
Platform Information
 Function description
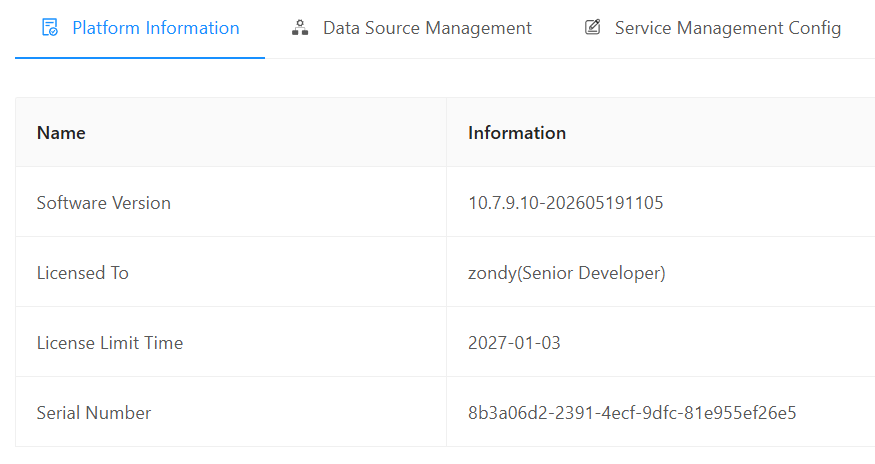
Platform Information displays the software and authorization details of the IGServer client.
 Operating instructions
1. Switch to the "Settings" page and click "Platform Information" to view the platform's basic information, as shown below:
Data Source Management
MapGIS SDE
GDBCatalog
The GDBCatalog directory only lists local data sources MapGISLocal and MapGISLocalPlus. HDF/HDB local databases can be attached; these data sources cannot be changed or deleted.
In practical applications, to manage data uniformly, users often store data on network data sources such as Oracle or SQL Server. Before attaching a network database, the corresponding network data source must first be added to the GDBCatalog directory tree node. Therefore, users must first confirm the DBMS product and whether the DBMS system already has a network database that conforms to the MapGIS data model.
Tip:
1. When publishing a service, when selecting a map document, you must ensure that the database where each data layer is located in the map document is correctly appended; otherwise, the source data may not be found and display properly.
2. Data source configuration information is recorded in two files: "Installation directory/program: Cln_Config.CFG MiddleWare_Cfg.xml". Configuration information for MapGISLocal and LocalPlus databases is recorded in the installation directory/program: MapGISLocalPlusServer.cfg and MapGDBSys.cfg. If users need to reconfigure or back up the data source or database configuration information, they can manually operate on the corresponding files and restart the service.
Basic process for attaching network databases:
For specific usage information, please refer to MapGIS Desktop (JiuZhou), which will not be explained in detail here.
Attach Local Data
Operating instructions
1. Switch to the "Settings" page, click "Data Source Management" - > "MapGIS SDE" - > "GDBCatalog" to view the existing data source configuration information:
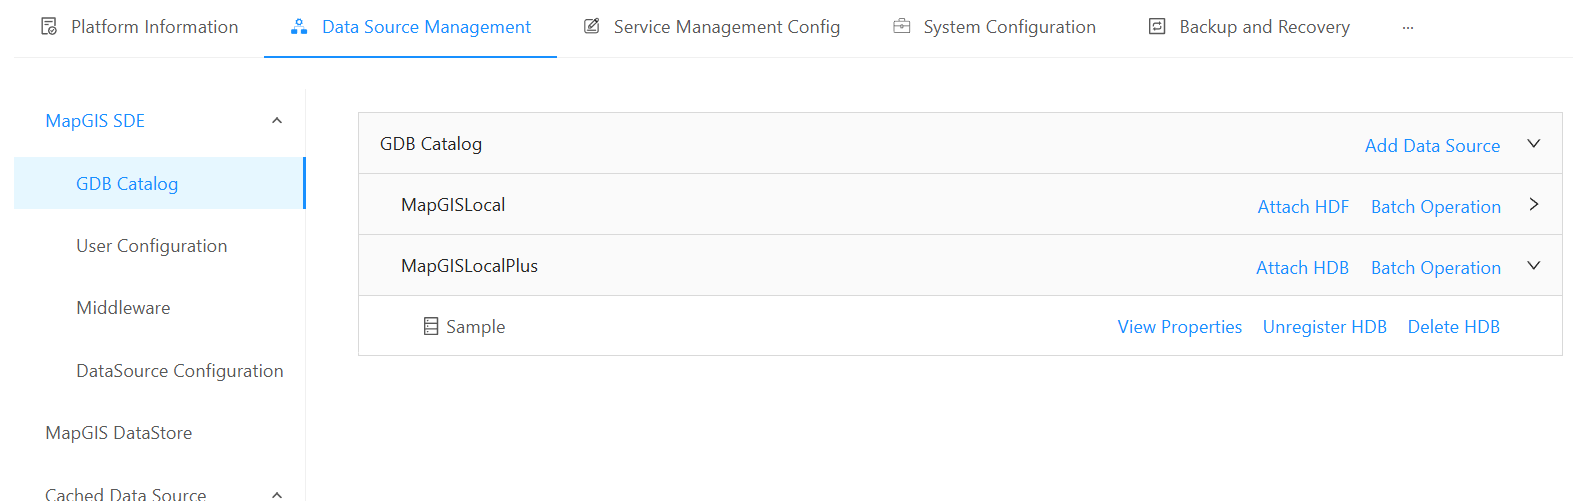
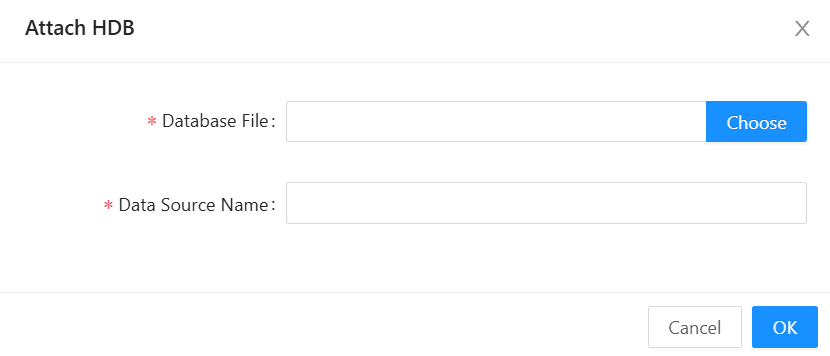
2. Click Attach HDF/HDB to select a local HDF/HDB file and attach the local database;
3. Click 'Log Out HDF/HDB' after clicking a database to delete the database;
4. Click on the delete HDF/HDB option after a database to delete that database;
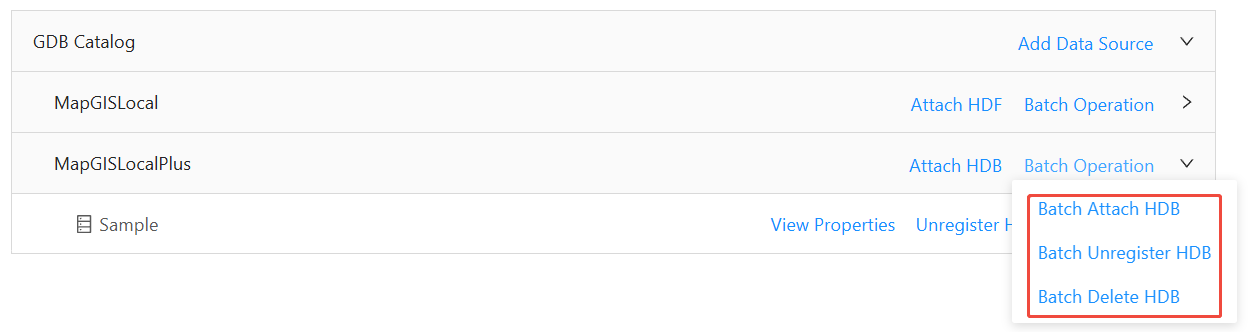
5. Data source is HDF; HDB can perform batch addition, deletion, and cancellation operations;
Tip:
After deleting the database, not only will it be logged out, but the local database files will also be deleted.
Additional network data sources
Function description
In practical applications, to manage data uniformly, users often store data in network data sources such as Oracle, PostgreSQL, DM, and KingBase. Before attaching a network database, users must first confirm the DBMS product and whether a network database that meets the MapGIS data model already exists on the DBMS system.
Tip:
1. The configuration methods for various network databases are basically the same as those for MapGIS Desktop (JiuZhou), so you need to follow the steps to configure the relevant settings first.
2. For databases such as Oracle and DM, you need to modify the configuration file "/igserver_for_java/bin/set-env.sh" to add information about the database environment variables. Taking DM Database as an example, users need to stop the IGServer service first. Add the "/home/dmdba/dmdbms/bin" path information from the DM database to the TEMP_LD_LIBRARY_PATH. After adding, run the "source set-env.sh" command to activate the environment variables, then restart the IGServer service.
Operating instructions
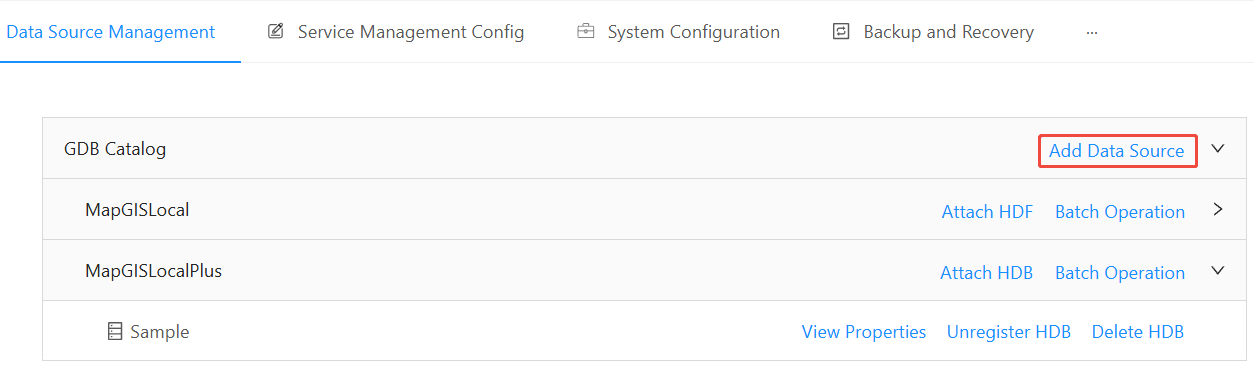
1. Switch to the "Settings" page, click "Data Source Management"->"MapGIS SDE"->"GDBCatalog", click "Add Data Source" in GDBCatalog;
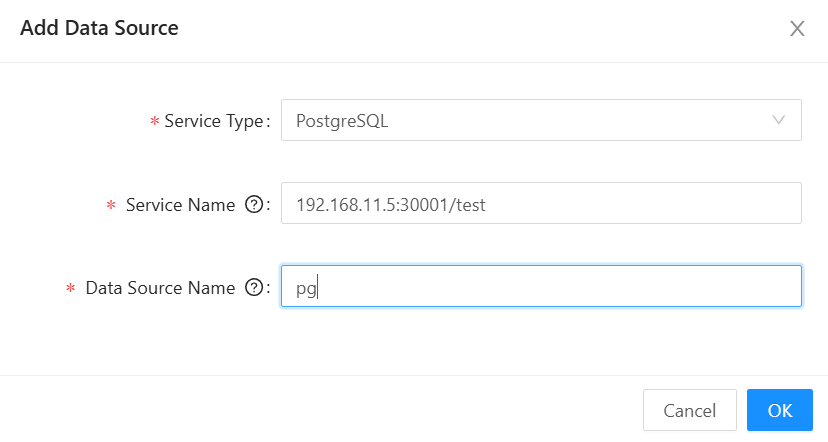
2. Select "Service Type", enter "IP:Port" or "IP:Port/dbname" in "Service Name", enter "Data Source Name", and click "OK" to add the network data source;
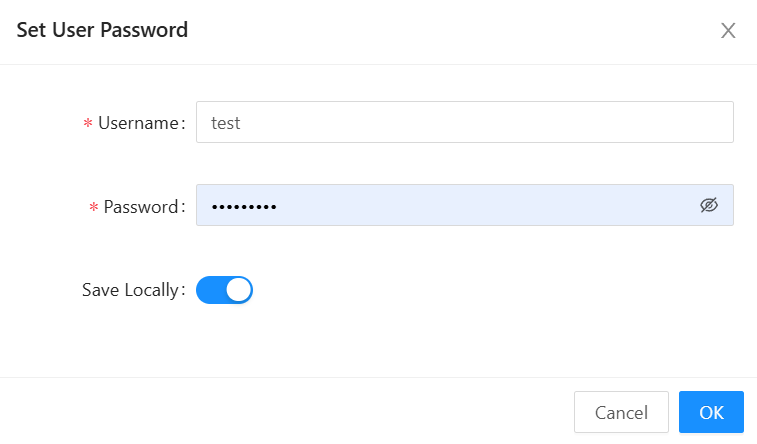
3. Set the username and password in the added data source and save them locally to add the network database;
4. Click "Delete Data Source" to delete the data source.
Tip:
Similarly, you can add Oracle-based data sources, MySQL-based data sources, and DB2-based data sources. Different types of data sources indicate different connection methods between client and server sides. These methods operate through different types of data transmission protocols, and through these data sources, GIS spatial data can be accessed on various types of data servers supported by MapGIS.
User Configurtarion
Function description
After adding a network data source, you need to save username and password information to ensure normal access to the data source.
Operating instructions
1. After adding the network data source, you can save the information locally by setting username and password information;
2. Users can view saved username and password information in "Data Source Management" - > "MapGIS SDE" - > "User Configurtarion", and can also manually add usernames and passwords for specified data sources.

Middleware
Function description
To better integrate heterogeneous data with MapGIS and expand its functionality, enabling information sharing of multi-source heterogeneous data on the MapGIS platform, the platform uses middleware to support browsing and updating heterogeneous data within the MapGIS platform. Middleware acts as the bridge between the MapGIS platform and heterogeneous data.
Currently, the middleware includes: ArcSDE Middleware、ArcGIS FileGDB Middleware、ArcGIS PersonalGDB Middleware。
By default, the system automatically registers middleware. Users can edit it. The current system support for middleware is shown in the table below:
| Types of middleware | Windows X64 | Linux X84_64 | Linux aarch64 | Linux Mips | Linux SW |
|---|---|---|---|---|---|
| Cross platform ArcSDE | √ | √ | × | × | × |
| Cross platform FileGDB | √ | √ | × | × | × |
| PostgreSQL Middleware | √ | × | × | × | × |
Operating instructions
1. Switch to the "Settings" page, click "Data Source Management" - > "MapGIS SDE" - > "Middleware" to view existing middleware information:
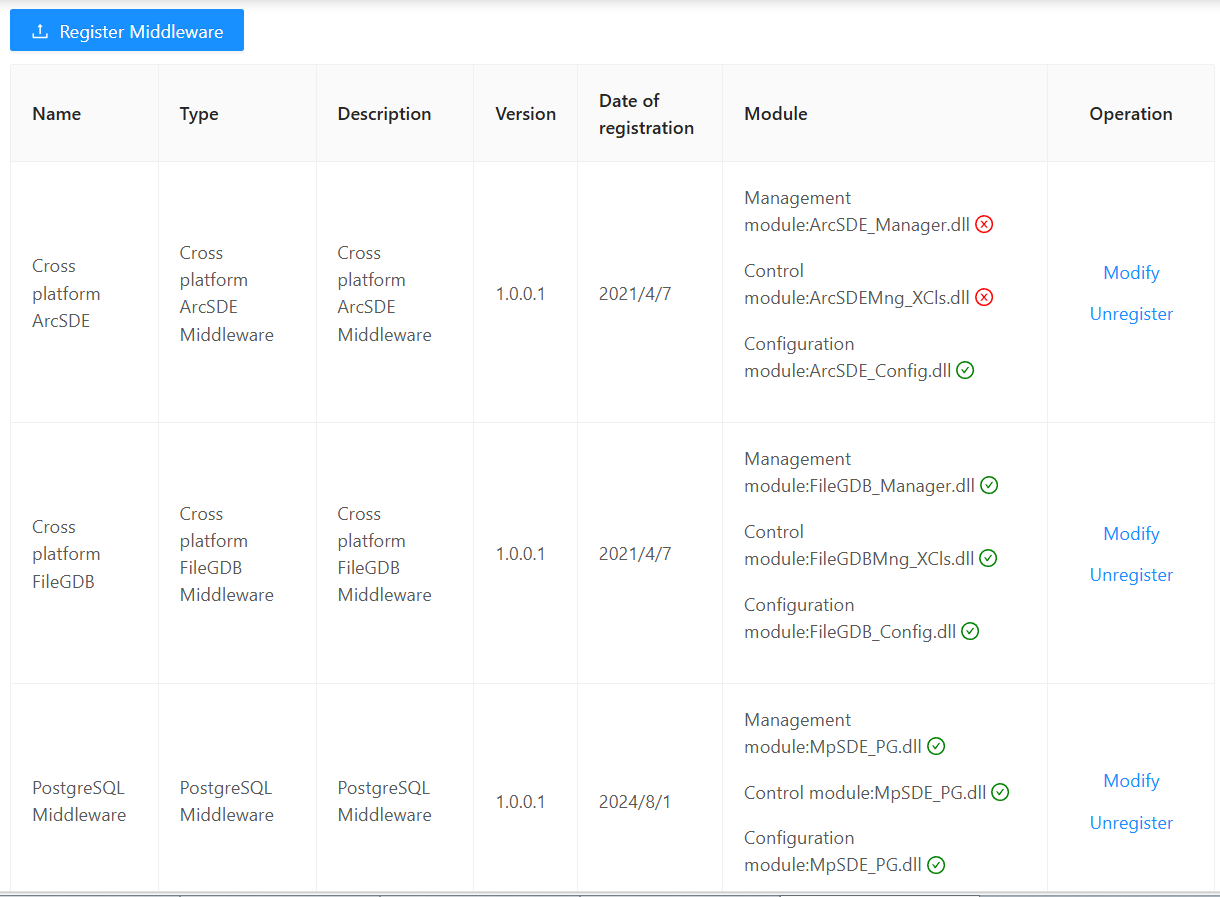
2. If middleware information is missing, click "Register Middleware" to register middleware;
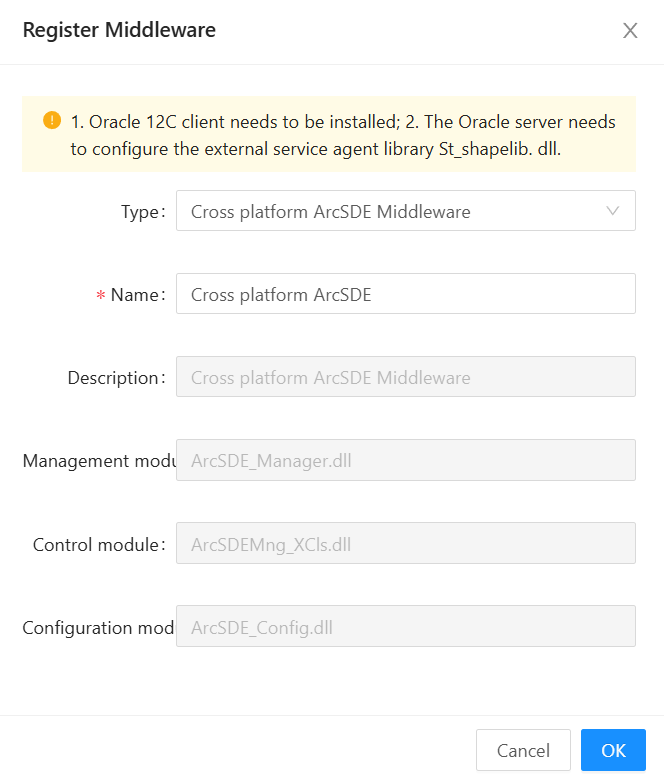
3. Click "Modify" after a middleware in the list to edit the middleware registration information;
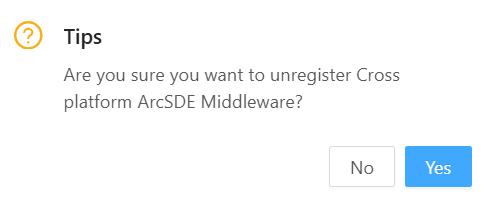
4. Click "Unregister" after a middleware in the list to log out that middleware.
DataSource Configuration
This configuration is used to set data source connection information to improve data access efficiency.
- [ArcSDE Max Connections]: For data connection parameter settings in the ArcSDE data source, refer to the "PG Data Source" settings.
- [DM Max Connections]: For data connection parameter settings in the DM data source; refer to the "PG Data Source" settings.
- [DMSpatial]: For data connection parameter settings in DMSpatial's data source; refer to the "PG Data Source" settings.
- [HighGo]: For data connection parameter settings in the HighGo data source, refer to the "PG Data Source" settings.
- [MongoDB]: For data connection parameter settings in MongoDB, refer to the "PG Data Source" settings.
- [MUT Max Connections]: Direct access to connection information from mut tile data.
- [MySQL Max Connections]: Recommended value is total CPU threads * 5, default value is 10.
- [PolarDB]: PolarDB data connection parameter settings, which can be referenced in the "PG Data Source Connection Pool" settings.
- [Yashan Max Connections]: Recommended value is total CPU threads × 5, default value is 2.
- [PG]: Settings related to connecting to PostgreSQL data sources.
- PG Max Connections: When MapGIS accesses the PostgreSQL database through multiple processes, it can automatically increase the number of connections, improving PostgreSQL data reading efficiency. Set the maximum number of connections that can be increased here.
- PG Min ldle Connections: When the MapGIS program accesses the PostgreSQL database through multiple processes, it can automatically increase the number of connections, improving PostgreSQL data read efficiency. If the operation to access the PostgreSQL database is no longer performed at this point and exceeds the maximum idle time of the PG data source connection pool, the number of connections can be automatically reduced to this set value.
- PG Initial Size: The default number of connections when a MapGIS program accesses the PostgreSQL database via a one-way approach.
- PG Max Wait Time (s): When the MapGIS program does not perform operations related to accessing the PostgreSQL database, it can be considered idle time. Setting the maximum idle time helps release the connection count resources of the PostgreSQL database in a timely manner.
- PG Max ldle Time (s): The longest waiting time when connecting to the PG data source. If no data returns after this time, a blank image will be displayed.
Tip:
1. This configuration information is recorded in the file "MapGIS Installation Directory\Program\Config\DataManage\DataManage.ini". Desktop and IGServer products in the same environment share a set of parameter configuration information.
2. For data reading, the larger the number of connections, the more efficient it is for data read. The PostgreSQL database has a maximum number of connections. When all clients occupy more connections than the maximum, some clients may experience abnormal connections to the PostgreSQL database.
3. Each MapGIS Dekstop application is equivalent to one client, and each DCS in MapGIS IGServer is a client. After connecting to the PostgreSQL database via the database connection tool, you can query the usage of connection counts using the following query statements.
show max_connections;
select * from pg_stat_activity;
select * from pg_stat_activity where not pid = pg_backend_pid();
MapGIS DataStore
Function description
MapGIS DataStore can manage various types of big data and can link DataStore site information within IGServer. After successful association, you can use the vector, tile, and other data published within it.
Operating instructions
1. Switch to the "Settings" page, click "Data Source Management" - > "MapGIS DataStore" to view the MapGIS DataStore data source configuration information:

2. Click "Modify MapGlS DataStore Configuration", modify DataStore site information:
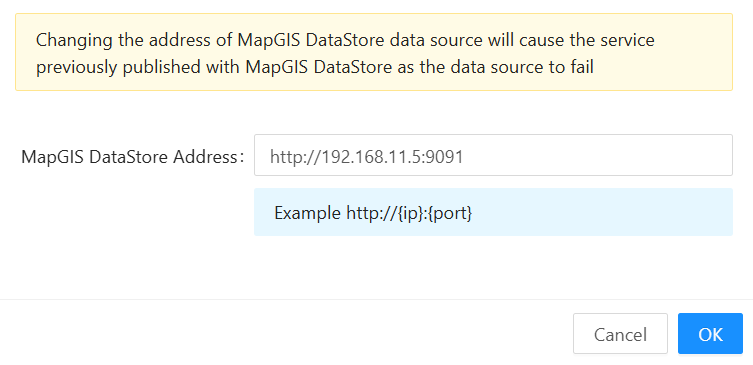
Cached Data Source
Function description
Manages data sources storing grid tiles, vector tiles, and 3D cached data, allowing direct reading of data from cached data sources when publishing services.
Operating instructions
MongoDB
1. Switch to the "Settings" page, click "Data Source Management" - > "Cached Data Source" - > "MongoDB Configuration" to view the MongoDB data source configuration information:

2. Click "Add" to open the Add Data Source dialog box. After entering the configuration information and confirming, you can add the data source configuration;
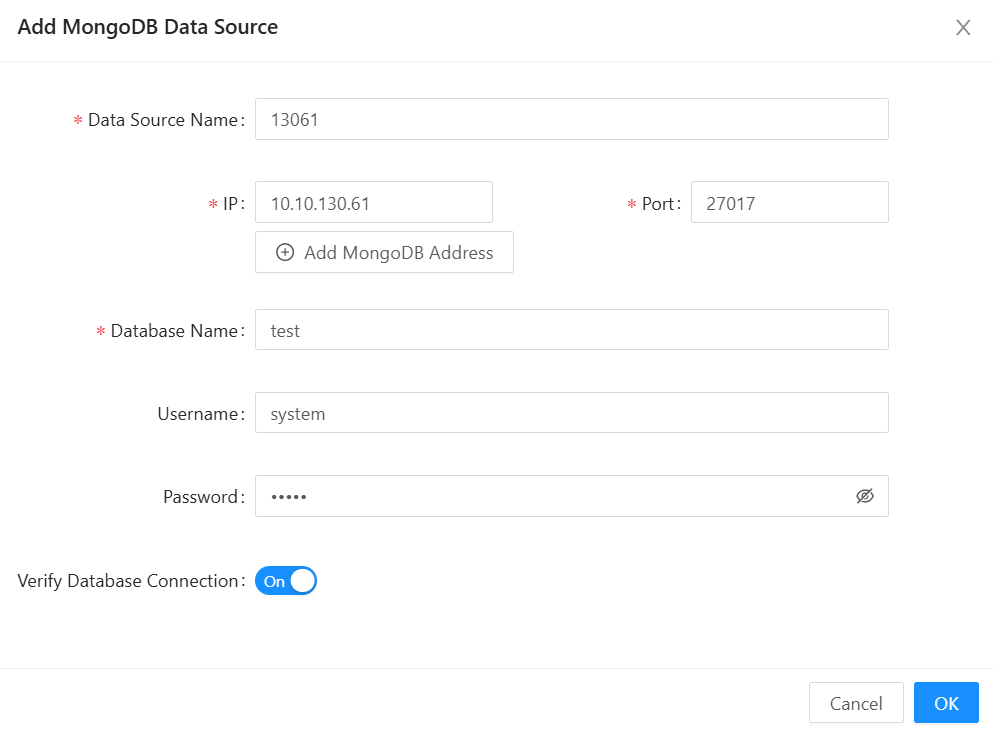
- [Data Source Name]: Custom input of the data source name;
- [IP/Port]: Enter the IP and port information of the MongoDB data source;
- [Database Name]: Enter the name of the MongoDB data source;
- [Username/Password]: Enter the username and password for the MongoDB data source. If the password is not enabled, leave this parameter blank;
- [Verify Database Connection]: After opening, you can verify the database connection status.
3. You can edit and delete added data sources.
PostgreSQL
1. Switch to the "Settings" page, click "Data Source Management"->"Cached Data Source"->"PostgreSQL Configuration", to view the PostgreSQL configuration information:

2. Click "Add" to open the Add Data Source dialog box. After entering the configuration information and confirming, you can add the data source configuration;
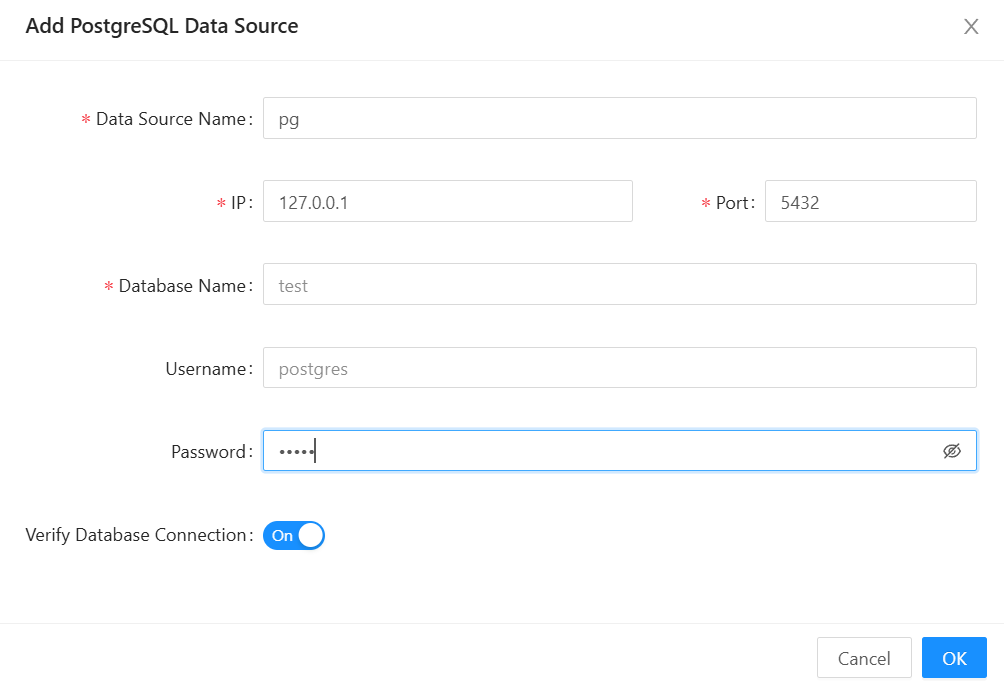
- [Data Source Name]: Custom input of the data source name;
- [IP/Port]: Enter the IP and port information of the PostgreSQL data source;
- [Database Name]: Enter the database name of the PostgreSQL data source;
- [Username/Password]: Enter the username and password for the PostgreSQL data source;
- [Verify Database Connection]: After opening, you can verify the database connection status.
3. You can edit and delete added data sources.
Folder
Function description
This feature provides users with shared folder management, allowing you to add/remove folders and support uploading files/folders from the client's local location to the node server for publishing services. When publishing the service, users can select files from local folders, such as *.mapx, *.mut, etc.
Tip:
Administrator users can register specified folders as shared folders. Other users do not have folder management functions; when publishing services, they can only view shared folders, ensuring the privacy of the IGServer server.
Operating instructions
1. Switch to the "Settings" page, click "Data Source Management" - > "Folder" to view the registered information of existing folders:

2. Click "Add Folder" to select a local folder and register it in the directory.
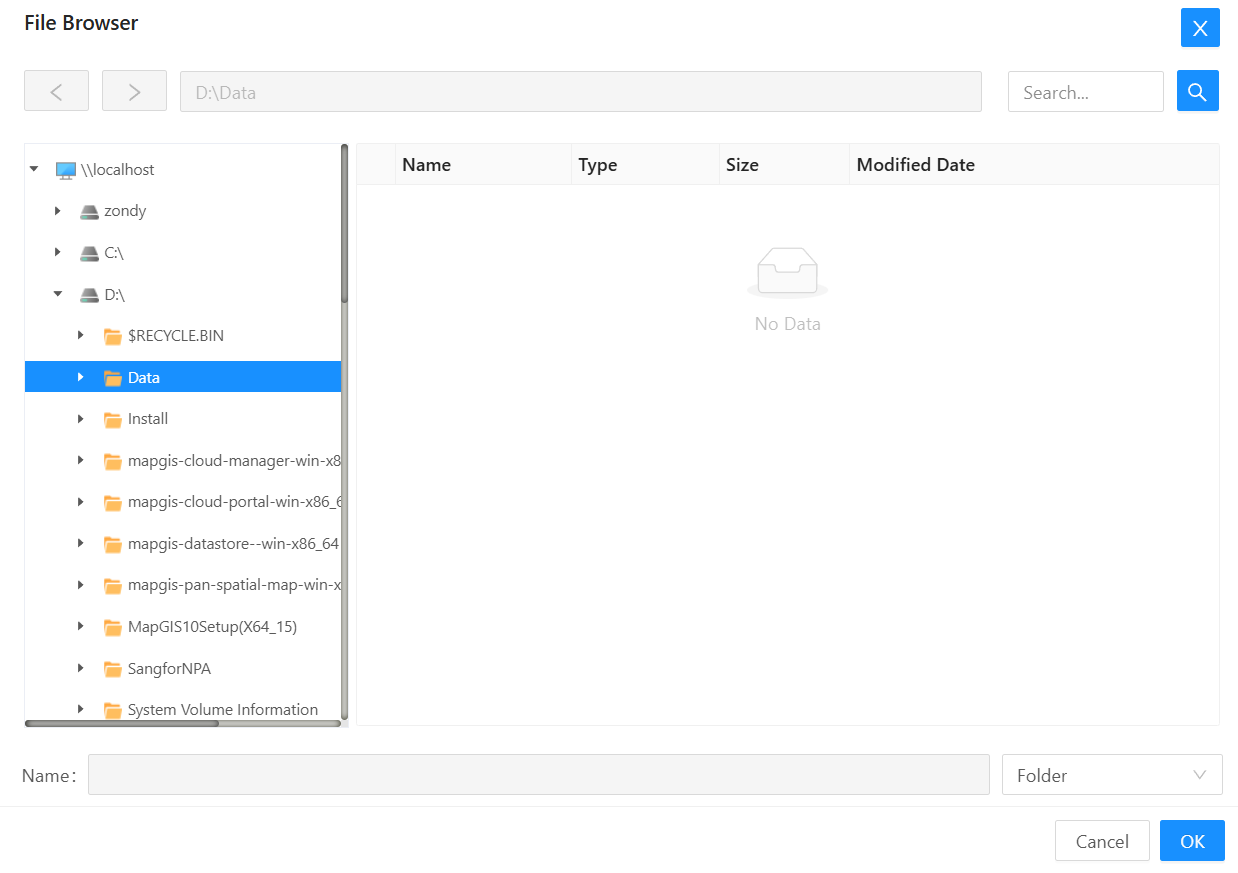
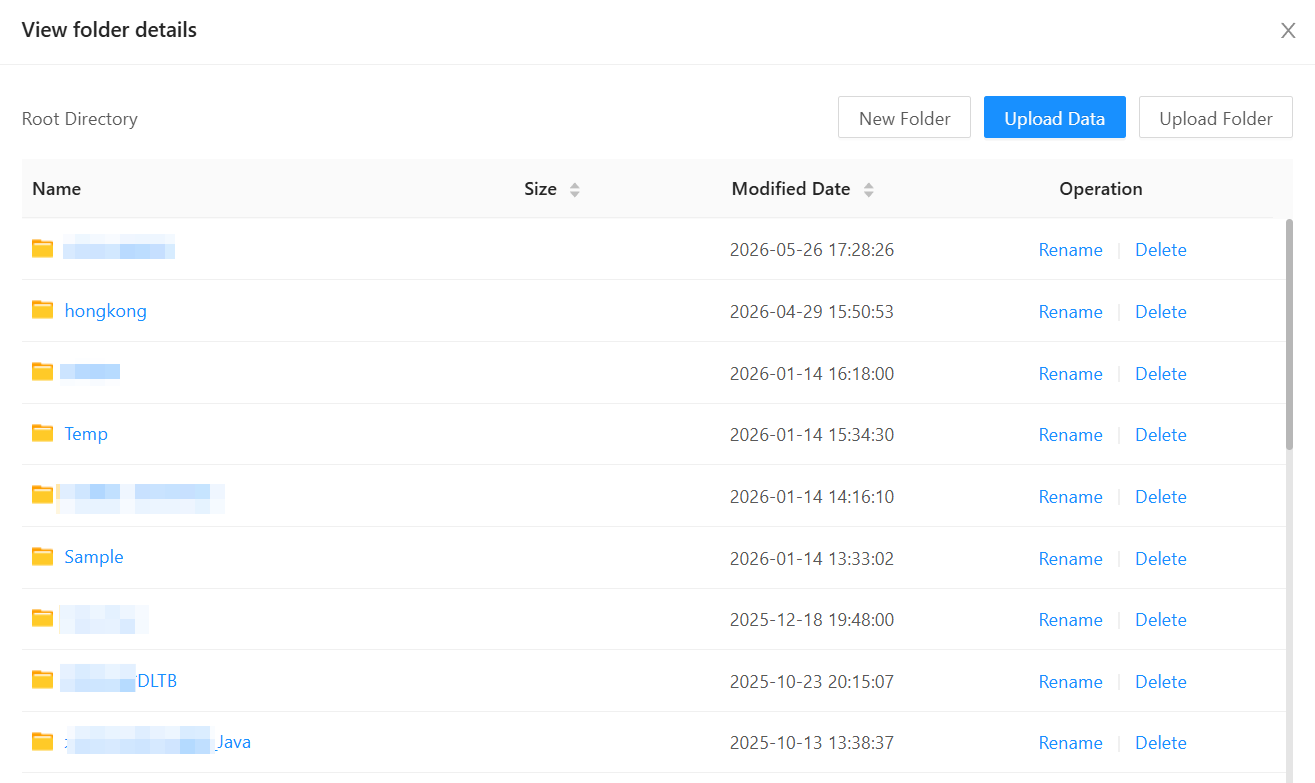
3. After clicking on a folder, click "View" to see a dialog box that displays all file information in the folder. Within the folder environment, operations such as New, Delete, Upload, Download, and Rename are supported. Uploading data and uploading folders can be directly migrated from the client-side location to the node server folder for publication, such as *.mapx, *.mut, etc.
4. Click "Delete" after a folder to remove it.
Service Management Config
Basic Service Configuration
1. Switch to the "Settings" page, click "Service Management Config" - > "Basic Service Configuration" to configure the basic service configuration;
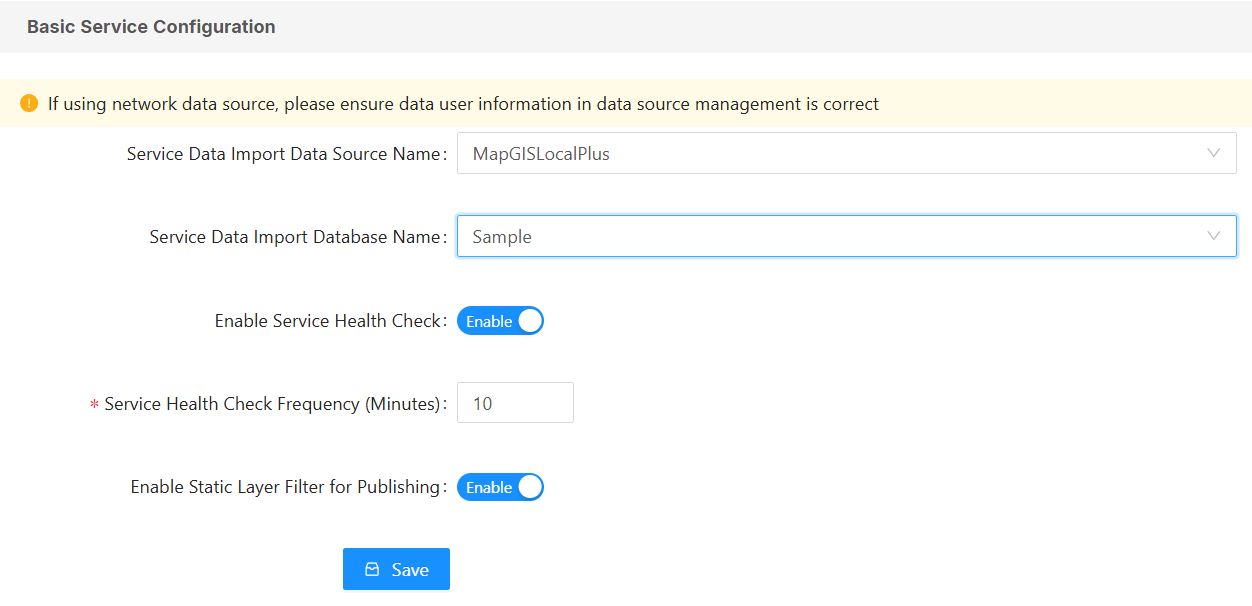
- [Service Data lmport Data Source Name]: When directly publishing GeoJson and Shapefile file data as services, the data will be imported into the database. Here, you can choose to configure either the local data source or the network data source;
- [Service Data lmport Database Name]: Select the database to store;
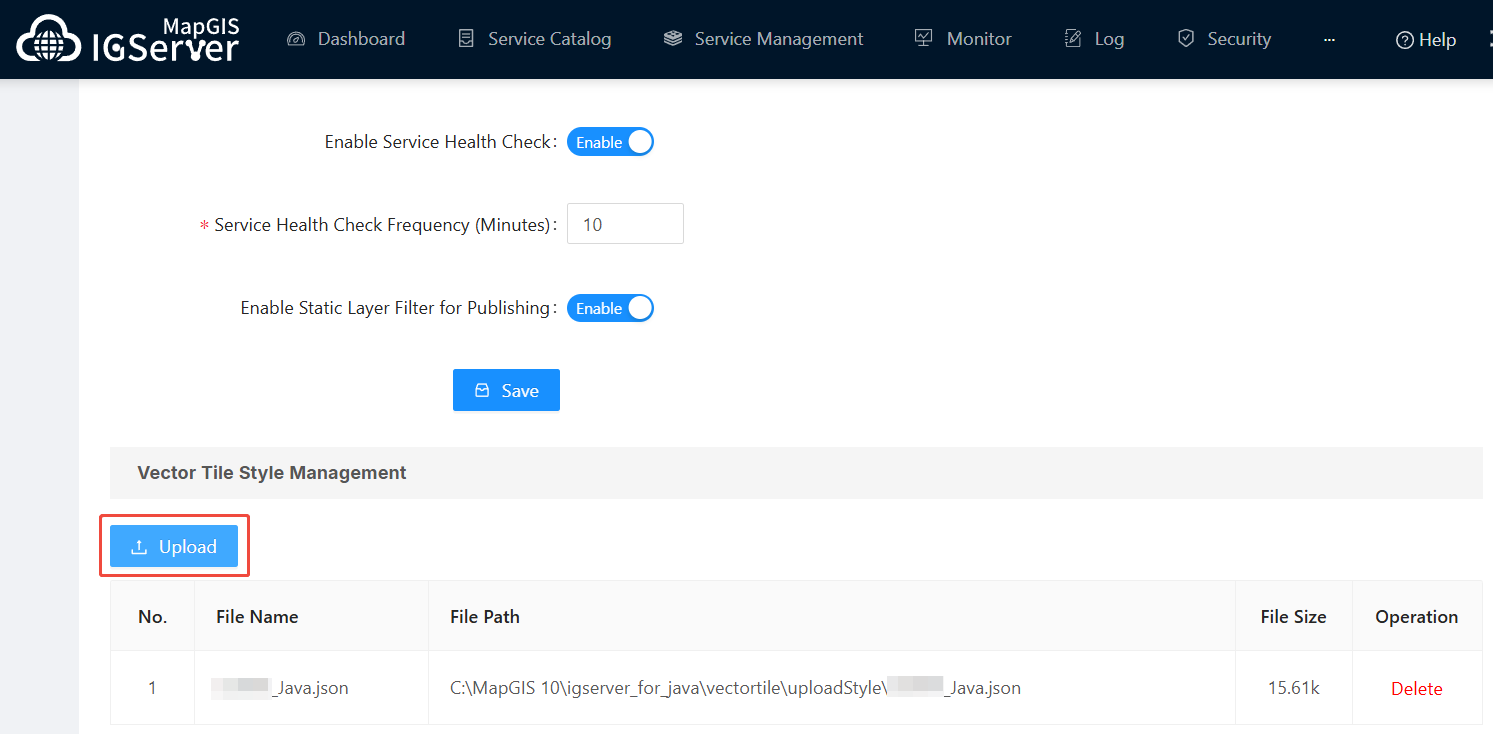
- [Enable Service Health Check]: You can choose whether to enable Service Health Check;
- 【Service Health Check Frequency (Minutes)】: After enabling Service Health Check, you can set the check frequency. For example, service availability will be checked every 10 minutes. Unavailable services will be shown as unavailable in the service management list;
- [Enable Static Layer Filter for Publishing]: Once enabled, you can select layers to filter when publishing the service.
Vector Tile sStyle Management
Function description
Uploading vector tile styles for unified management, and front-end secondary development calls can use vector tile services.
Operating instructions
1. Switch to the "Settings" page and click "Service Management Config" to upload vector tile styles, or delete individual styles:
System Configuration
Basic Configuration
Function description
Basic service configuration is used to view the service port number, number of DCS processes, maximum login failure count, service monitoring, and other configuration information, and can modify the information.
Tip:
After some information is modified, the IGServer service must be restarted before it takes effect.
Operating instructions
1. Switch to the "Settings" page and click "System Configuration" to view basic configuration information:
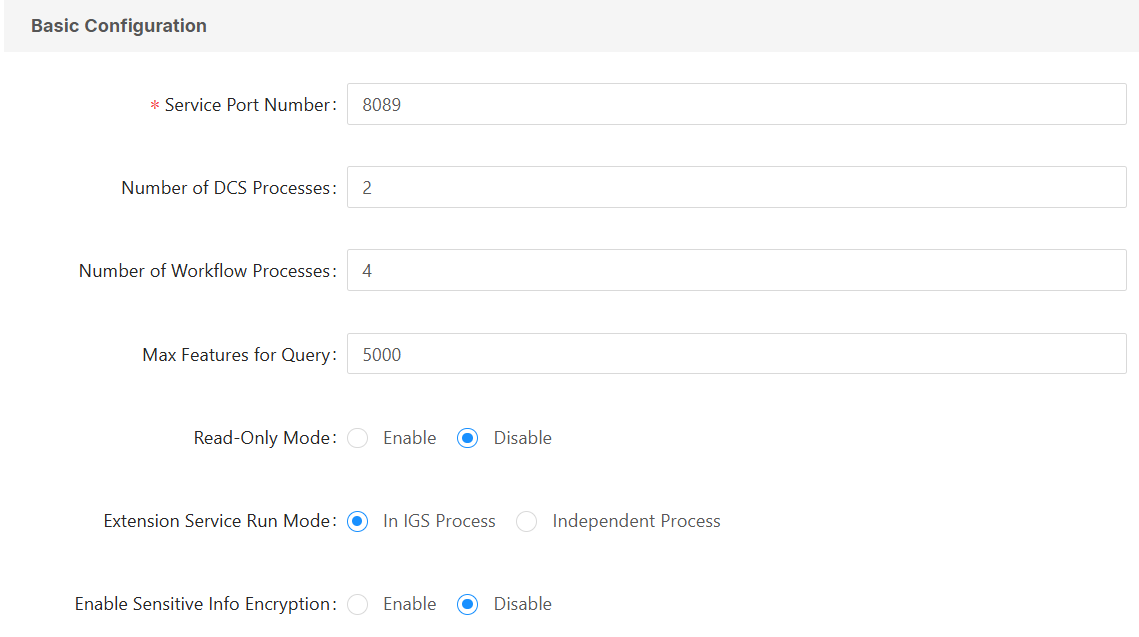
- [Service Port Number]: IGServer service port number, default is 8089. After modification, you must close and restart the IGServer service for it to be valid.
- [Number of DCS Processes]: The number of DCS processes, default value is [2,16]. When CPU has fewer than 8 cores, the default value is 2; When CPU has 64 cores or more, the default value is 16; In other cases, the default value is CPU cores divided by 4; if the number is odd, subtract 1. After manual modification, the user must close and restart the IGServer service to take effect.
- [Number of Workflow Processes]: Maximum number of workflow processes.
- [Max Features for Query]: The maximum number of entries viewed during feature queries.
- [Read-Only Mode]: After enabled, all system resources in IGServer cannot be modified.
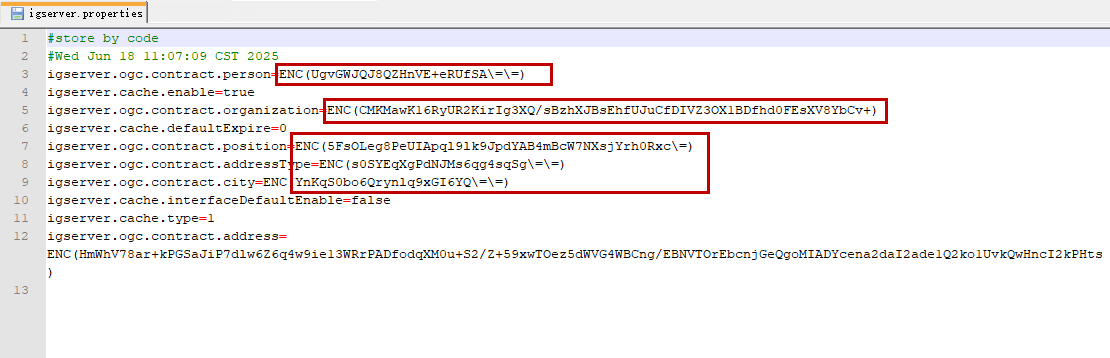
- [Enable Sensitive Info Encryption]: After enabling it, modify the OGC service configuration and other information, then directly view the configuration files on the IGServer server, which have been encrypted.
OGC Service Configuration
Function description
When publishing an OGC service, the ContactInformation section includes basic service information and displays basic details such as the service contact.
Operating instructions
1. Switch to the "Settings" page and click "System Configuration" to view the OGC service configuration information:
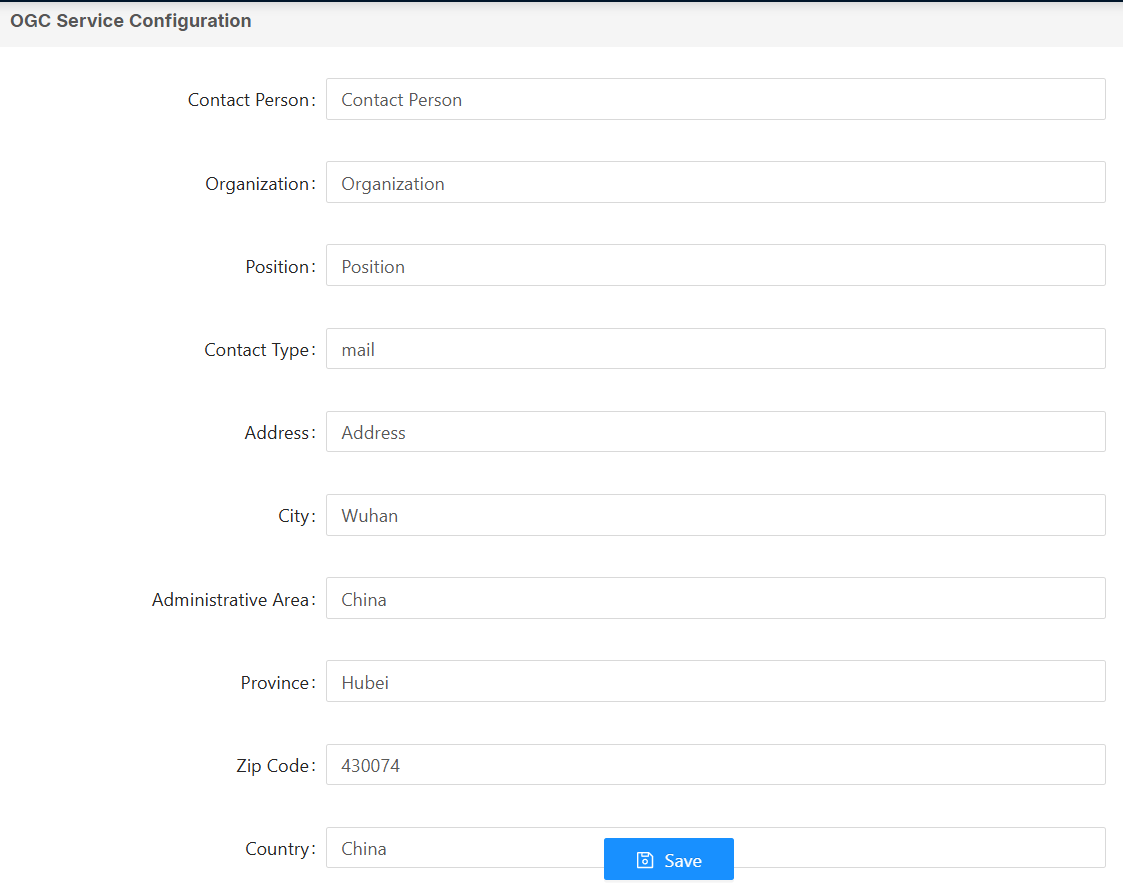
2. Users can modify information. When publishing OGC services, basic information is read from here.
Cache Configuration
Operating instructions
(a)Redis Cache
1. Switch to the "Settings" page, click "System Configuration", browsing to "Cache Configuration"-"Redis Cache Configuration", you can start the Redis cache:
2. Click "Add" to configure the server information;
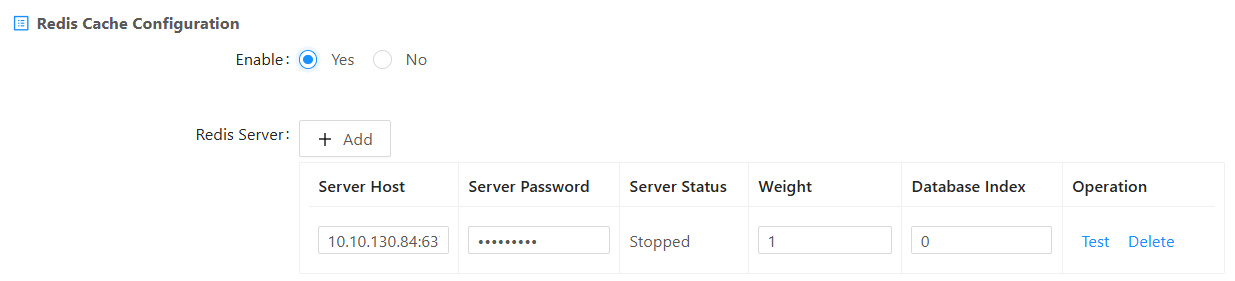
The added Redis cache can be a Redis stored separately on the Windows server. Enter the Redis server address and server password (the default port is 6379, which can be changed in redis.conf).
3. Click "Save" to save the information.
(b)Local Cache
1. Switch to the "Settings" page, click "System Configuration", browsing to "Cache Configuration"-"Local Cache Configuration", you can start the local cache:
2. Select Yes in the "Enable" option to configure cache settings.
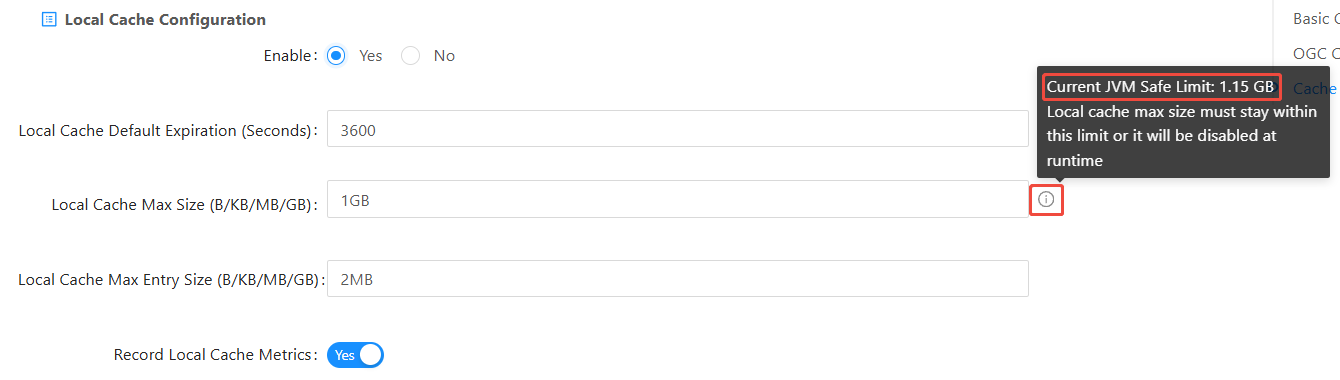
- [Local Cache Default Expiration (Seconds)]: Enable local cache will consume a certain amount of memory. Please set the local cache validity period appropriately; the cache will become invalid once this duration is exceeded.
- [Local Cache Max Size (B/KB/MB/GB)]: You can hover over the end of the input field to view the recommended value. Do not exceed the recommended value, otherwise local cache will be automatically disabled.
- [Local Cache Max Entry Size (B/KB/MB/GB)]: Keep the default value of 2MB.
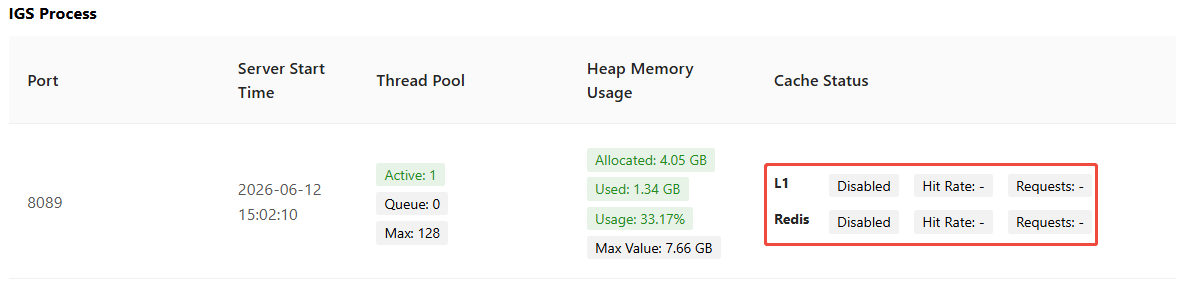
- [Record Local Cache Metrics]: After enabling, the local cache hit rate can be recorded, can be checked by navigating to Monitor -> System Status -> Server Process -> IGS Process.
3. Click "Save" to save the information.
Tips:
1、When you click "Save" after configuring Redis or local cache settings, the system will automatically reset the cache hit rate statistics. This ensures that the hit rate data reflects the performance of the new configuration from that point forward.
2、Enabling Redis or local cache can significantly improve the performance of concurrent tile service access. In general, a higher cache hit rate results in better performance. However, please note that deploying Redis on a separate machine from IGServer may introduce network latency, which can lead to a certain degree of performance degradation compared to a co-located deployment.
(c)Interface Cache
1. Switch to the "Settings" page and click "System Configuration" to start the interface cache;
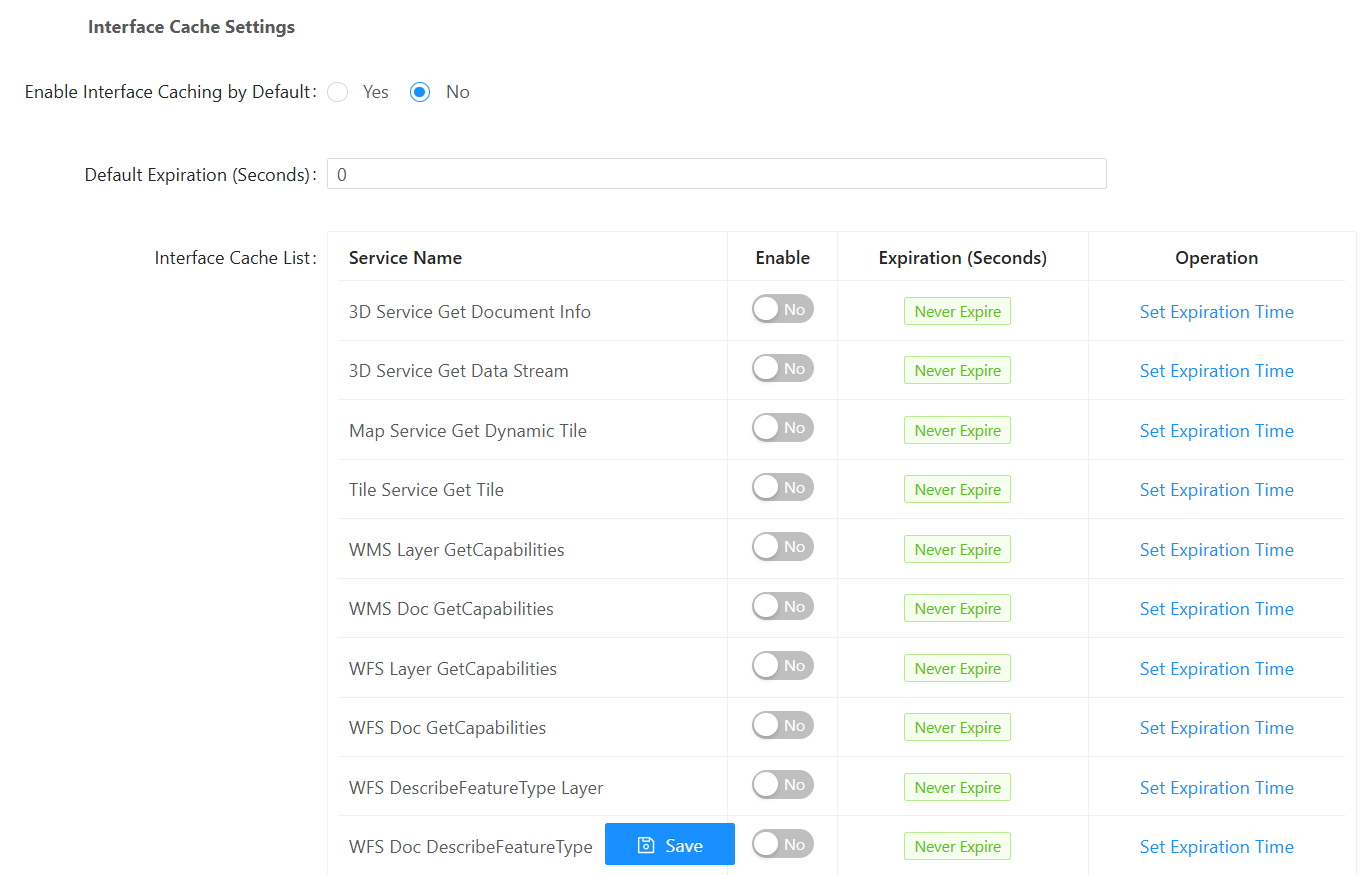
2. In the list, you can separately set whether to enable caching and cache expiration time for each type of interface. Click "Save" to save information.
Backup and Recovery
Backup and Recovery
Function description
With this feature, you can back up and restore published service information and IGServer configuration information.
Operating instructions
1. Switch to the "Settings" page, click "Backup and Recovery," then click "Backup" to back up information to the specified directory;
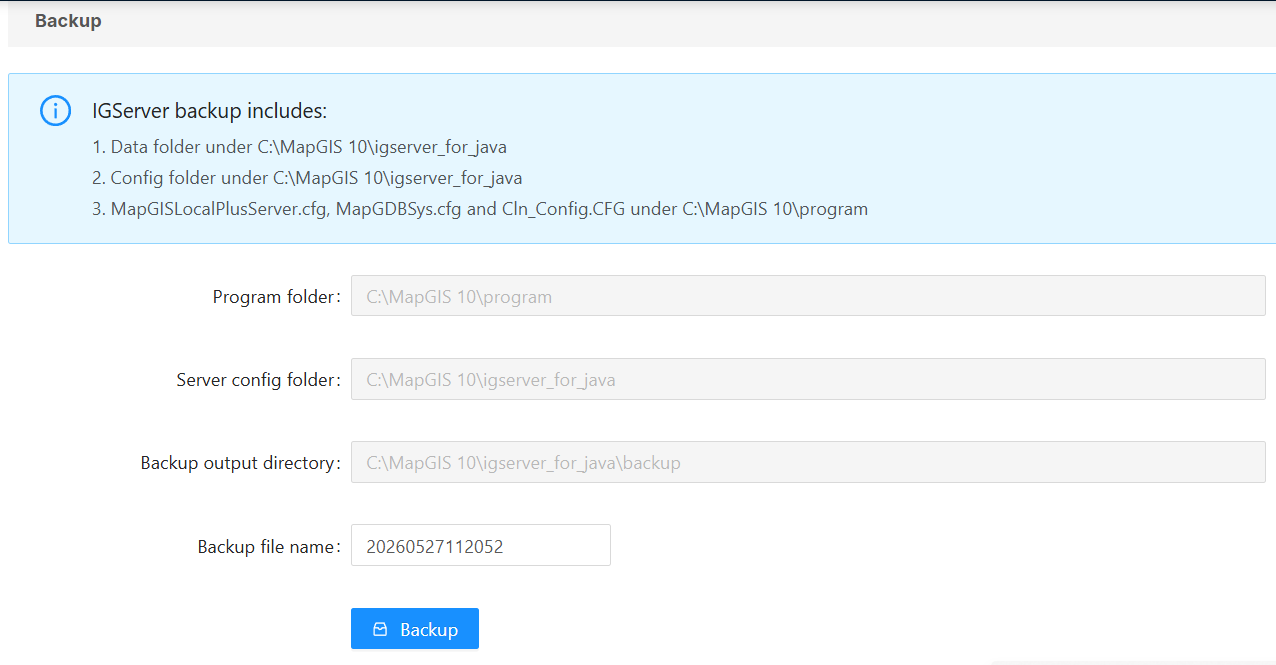
2. After a successful backup, the backup information is saved in the "MapGIS Installation Directory\igserver_for_java\backup" folder.
Tip:
The backup/restore function only applies to operations within the same client. Since some absolute path information is recorded in the backup information, such as the absolute path information of map documents (*.mapx) in the map service, the data source configuration for local HDF/HDB databases is absolute path information. If backup/restore operations are performed across multiple clients, consistency of these absolute path information must be ensured; otherwise, all related information is invalid.
3. Select the version to be restored via the dropdown menu and click "Restore" to restore to the specified version;
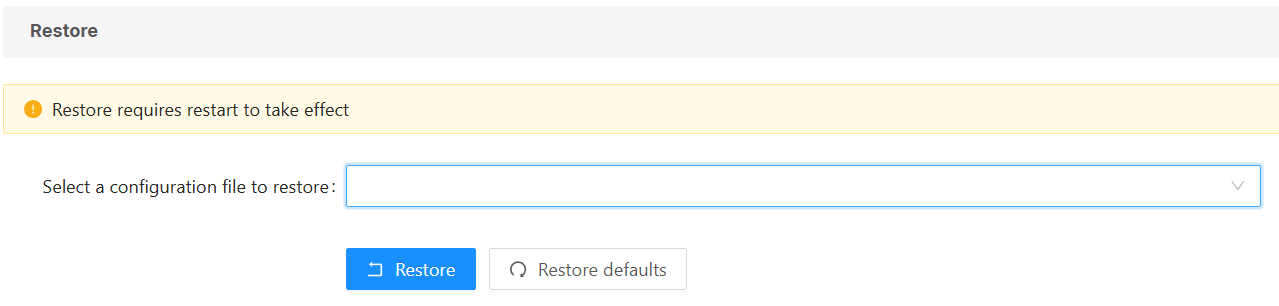
4. Click "Restore defaults" to restore the system to its initial state.
Legacy services migration
Function description
You can move the 2D map and tile services from IGServer versions 10.3.6.11 and earlier to the current IGServer service.
Operating instructions
1. Switch to the "Settings"->"Backup and Recovery" page, in "Legacy services migration":
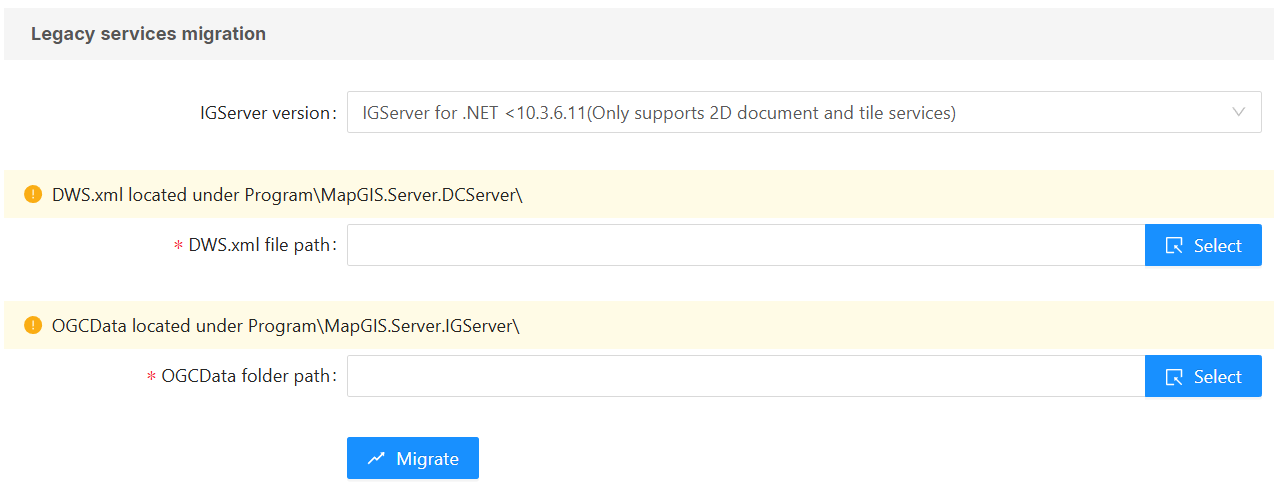
2. After setting the "DWS.xml File" and "OGCData folder" information, click "Migrate" to migrate the service.
Tip:
This function is only applicable to operations within the same client. Since some absolute path information is recorded in the configuration information, such as the absolute path information of the map document (*.mapx) in the map service, the local tile file is also absolute path information. If migrating between multiple clients, consistency of these absolute path information must be ensured; otherwise, all related information is invalid.
Site Configuration
Function description
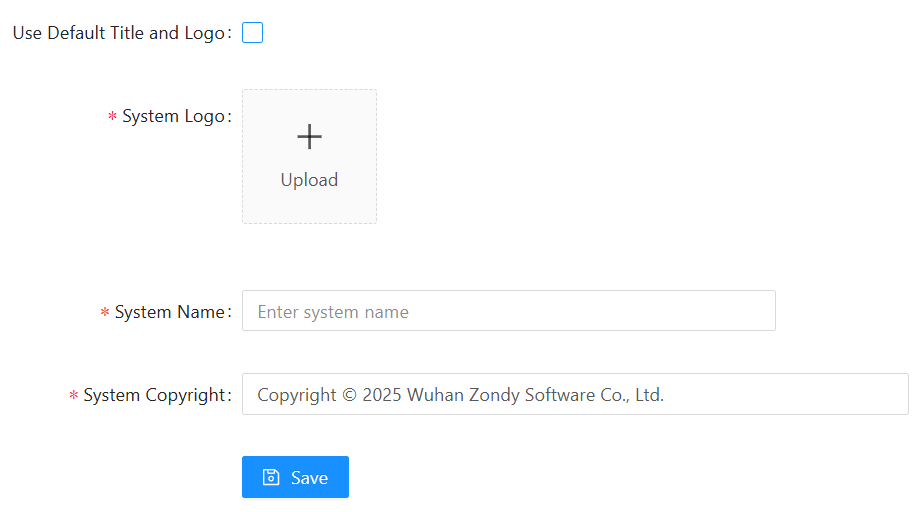
With this feature, you can set the system logo, title, and copyright information.
Operating instructions
1. Switch to the "Settings"->"Site Configuration" page:
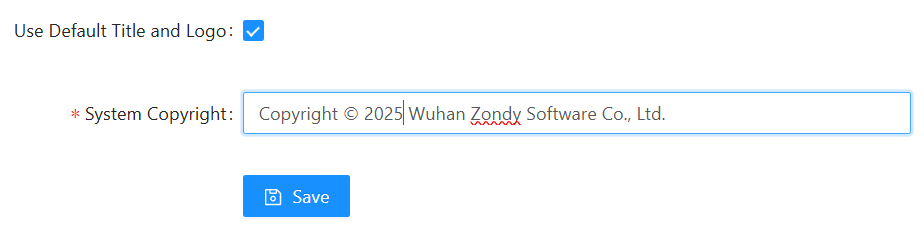
2. When "Use Default Title and Logo" is not checked, you can customize the logo and title information.
Theme Configuration
Function description
With this feature, you can set the ServerManager main interface style.
Operating instructions
1. Switch to the "Settins" - > "Theme Configuration" page to modify the interface style of the IGServer server:
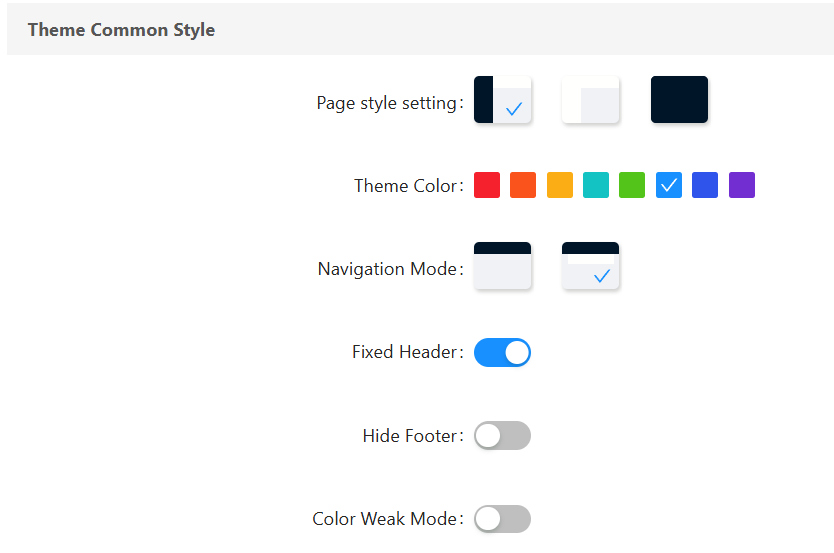
- [Page style setting]: Set the color style of the IGServer page;
- [Theme Color]: System dialog boxes, text, buttons, and other theme color information;
- [Fixed Header]: When turned on, it can fix the IGServerHeader;

- [Color Weak Mode]: When enabled, it displays the option to add Color Weak Mode.
Scheduled Task
System Backup Scheduled Task
1. Switch to the "Settings"->"Scheduled Task" page:
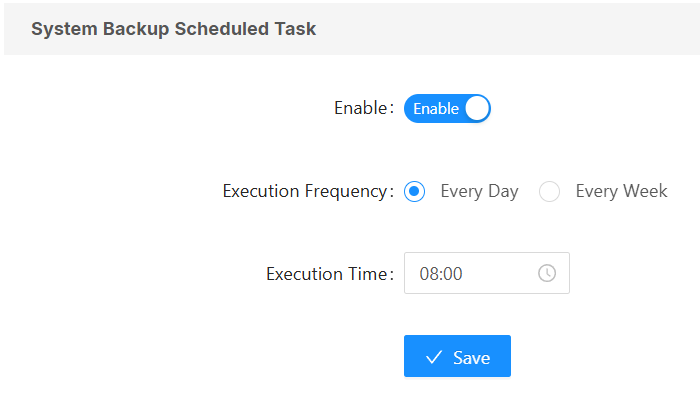
2. After activation, you can set scheduled tasks. Click "Save" to start the scheduled backup task.
System Restart Scheduled Task
1. Switch to the "Settings"->"Scheduled Task" page:
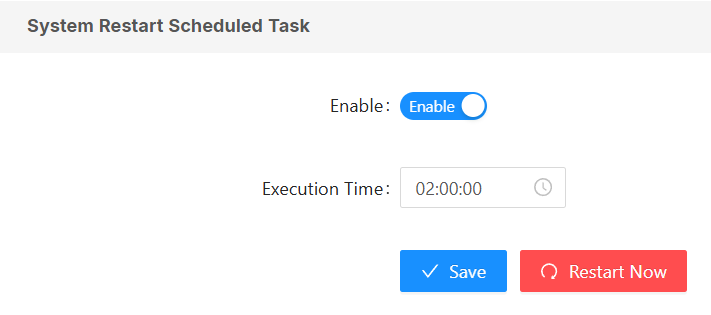
2. After activation, set the restart time, click "Save," and start the scheduled restart task for the IGServer service.
3. Supports manual immediate restart. Click "Restart Now" to instantly restart IGServer service tasks.
User Center
Function description
By entering the personal center, users can access basic information and set or change user passwords.
Operating instructions
1. Click 'User' in the upper right corner, then select 'User Center' from the dropdown list to enter the page.
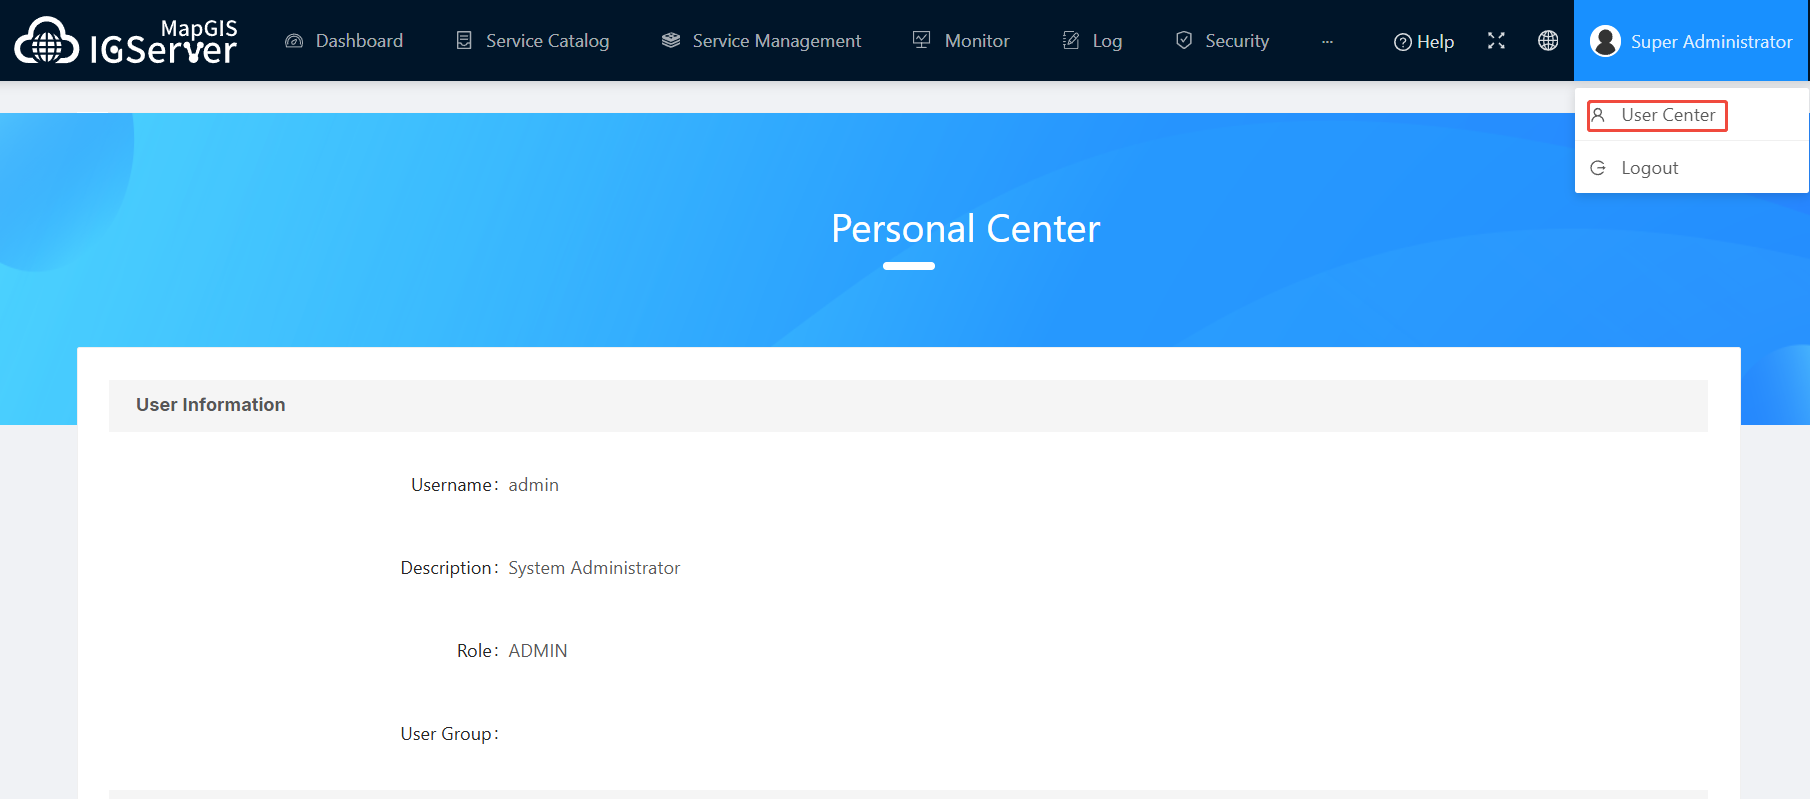
- [Change Password]: You can set a new password. After successful setup, the site will automatically pop up on the login page. Enter the new password again to enter.