Layer Management
Layer management
 Function description
Layer management is used to manage all previewed service data layers in a 2D map view or 3D scene, and provides different sub-functions according to different types of managed resources, such as visibility control, transparency, zoom to, pin, view metadata, attribute query, attribute table, model editing, and other functions.
 Operating instructions
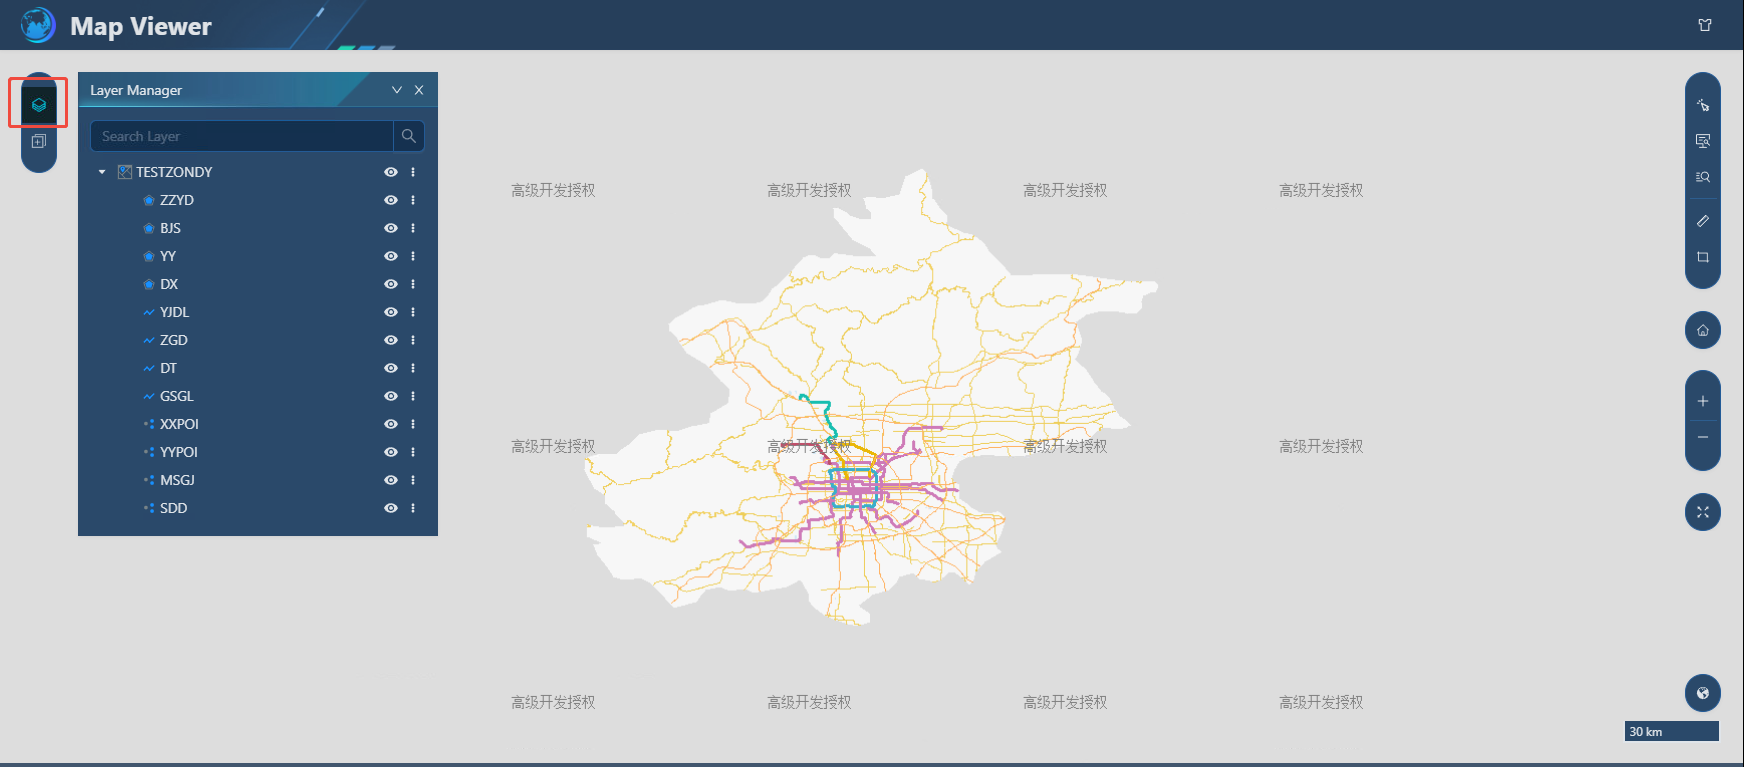
1. Click "Preview" to enter the "Map Viewer" preview interface.

2. Click "Layer Management" on the right side of the "Map Viewer" preview screen to pop up the "Layer Management" interface. If the service at the first level contains multiple layers, the information of its child nodes will be automatically generated according to the organization of the internal layers of the service under the first level, and displayed in a tree structure. As shown in the figure below, this service is a MapGIS map document service, which contains group layers, and the hierarchy of the map service is expressed in a tree shape in the layer list:
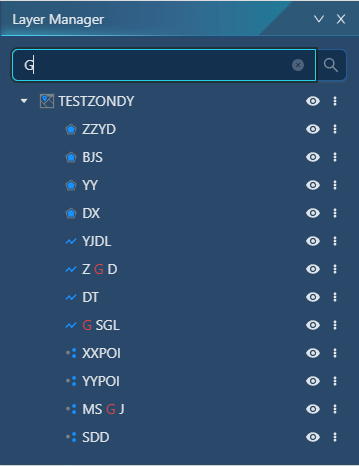
3. When there are many layer resources, users can use the search function provided by the layer tree panel to quickly find or expand nodes containing keywords entered by users and highlight them, as shown in the figure below:
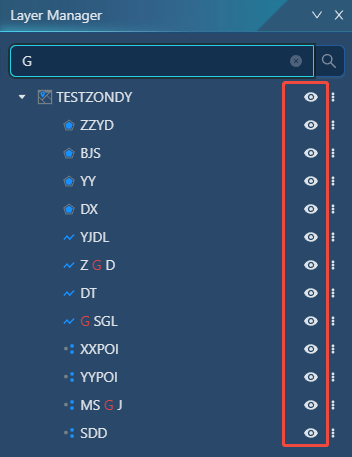
- [Show/Hide] By turning on/off the icon
 corresponding to the layer list, you can realize the visibility control of services, and support multi-granular control of services, group layers, and individual layers.
- [Zoom to] Click the
 menu on the right side of the corresponding service/layer and click Zoom to 2D map view or 3D scene to the display range of the target service.
 - [Opacity] Click the menu on the right side of the corresponding service/layer, click "Opacity", and drag the scroll bar of the corresponding service to adjust the transparency of the 2D map service and the 3D scene service.
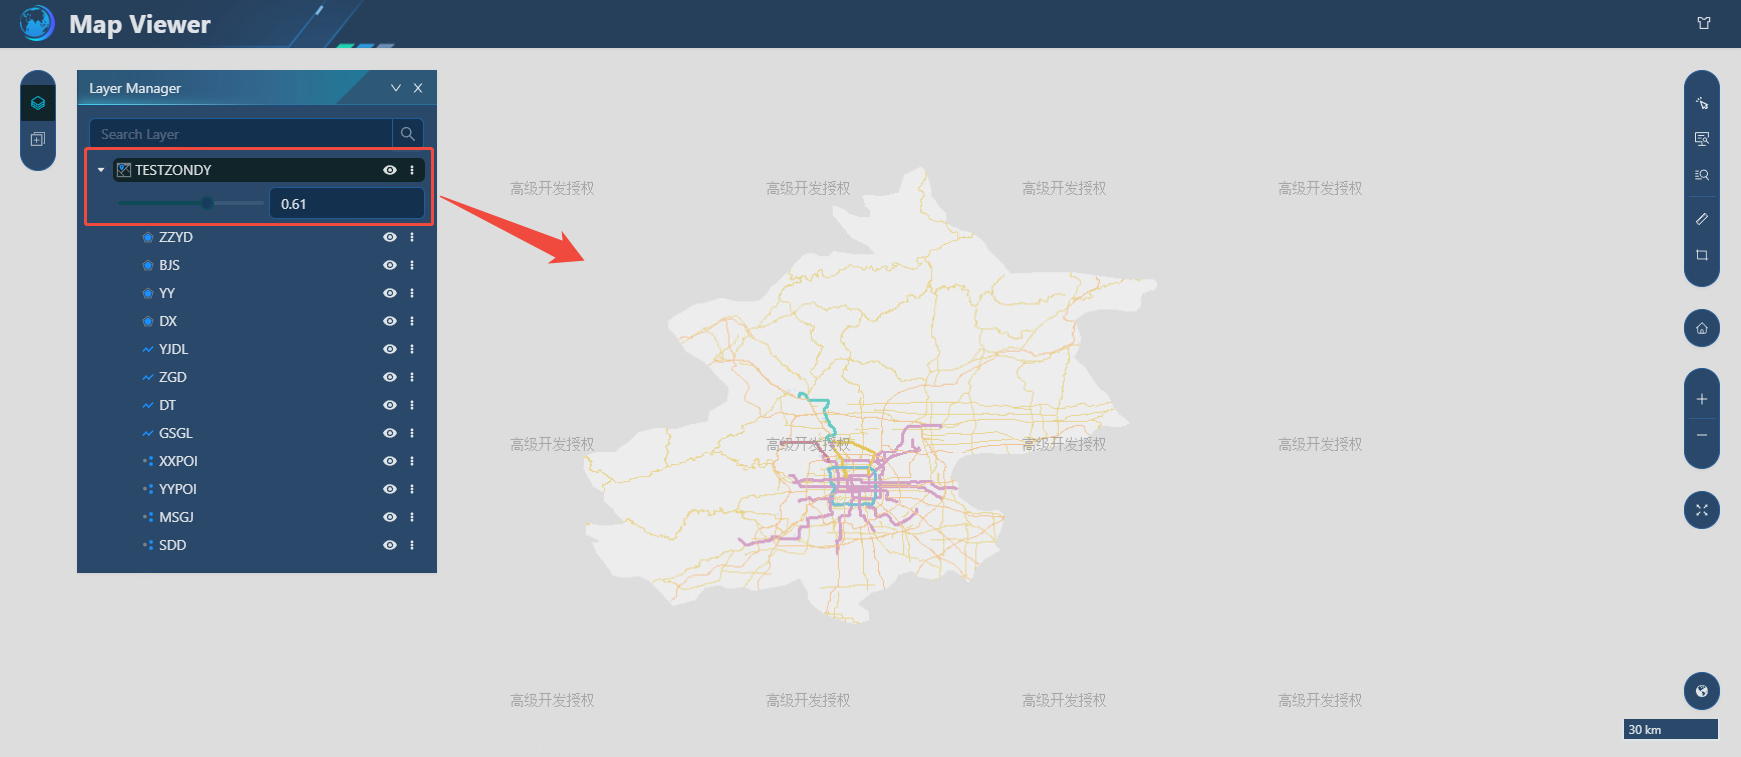
- [Layer Info] Click the menu on the right side of the corresponding service/layer and click Layer Info to view the metadata information of the service.
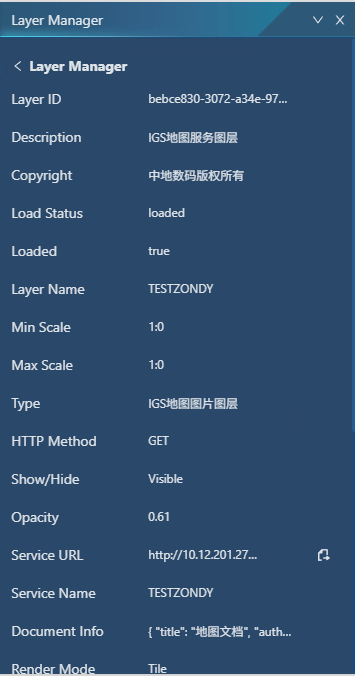
- [Layer Attribute] Click the menu on the right side of the corresponding service/layer, click "Layer Attribute", users can set different front-end request parameters according to their needs, most of the parameter settings of this interface are mainly displayed in front-end development applications, after parameter setting, you can view the request return parameter information through "F12", or you can check the parameter setting information by viewing "Layer Information".
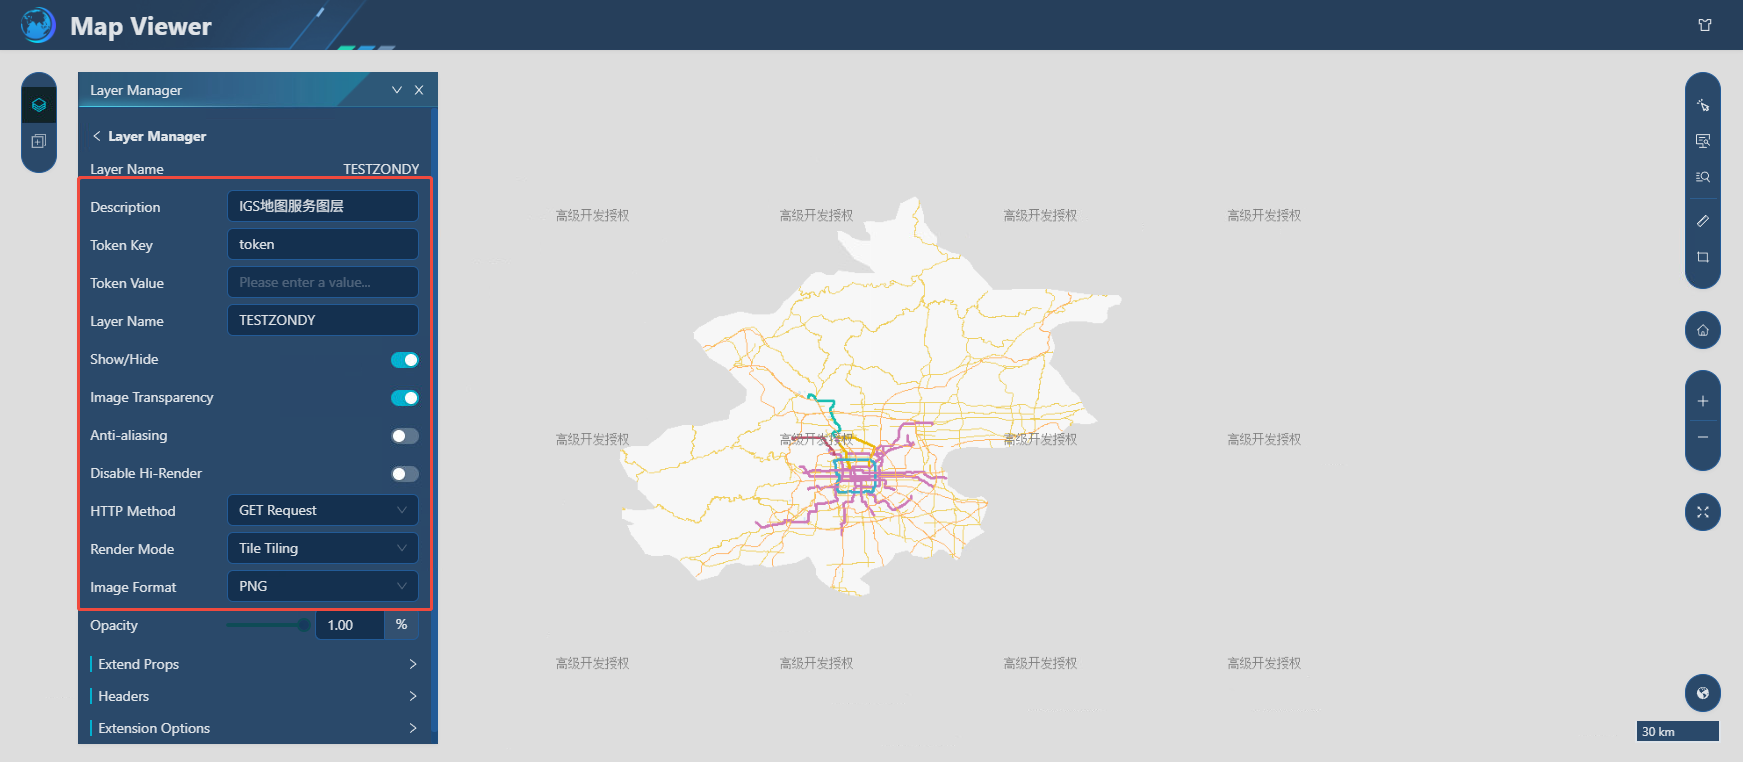
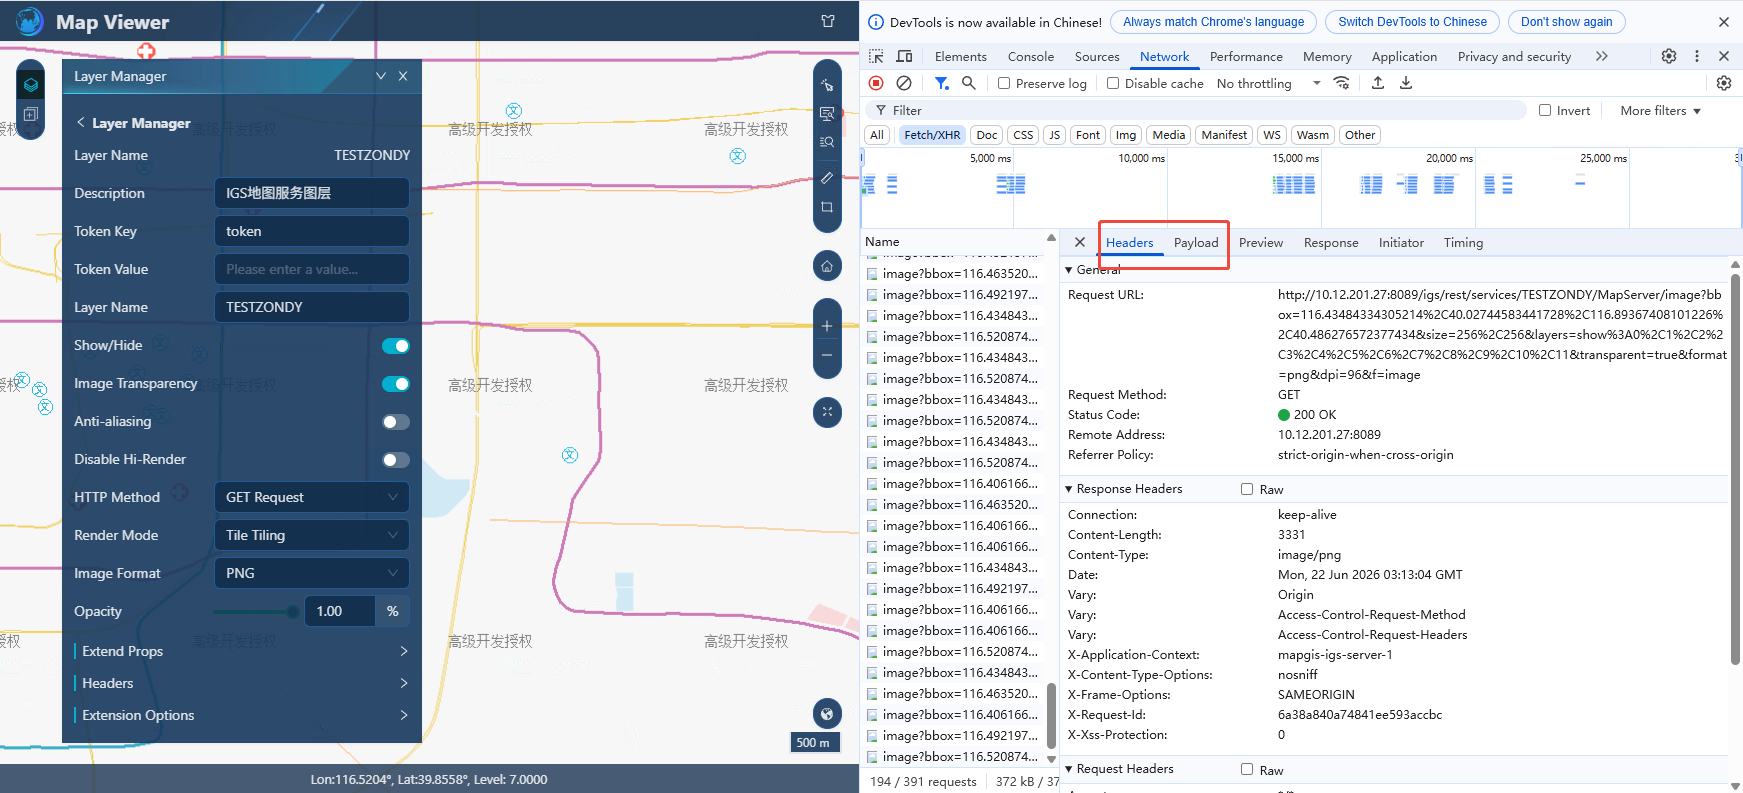
The corresponding parameters for different types of service layers are different. For example, the raster tile service and WMTS service are essentially to provide the display effect of the map in the form of tiles, and the following parameters can be set:
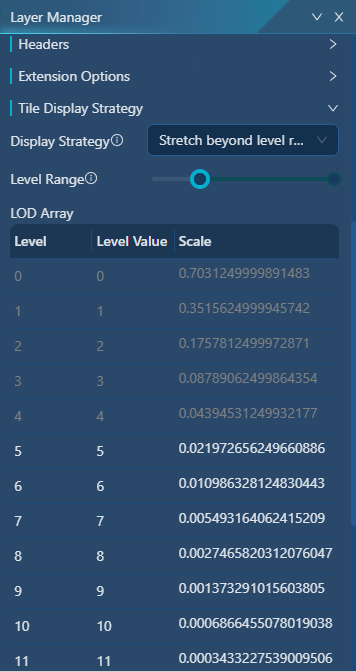
[Display Strategy] including Stretch beyond level range and Hide beyond level range:
- Stretching: When the display range of the view exceeds the hierarchical range, the stretch display method is used to ensure that the service layer is always displayed during the view scaling process, but it may cause a mosaic effect.
- Hidden: When the display range of the view exceeds the hierarchical range, the hidden display mode is used to ensure the clarity of the view when the service is scaled to ensure clarity, but the service layer will not be displayed outside the scope.
- Level Range: Sets the level range of the service display.
- Tile Information: Displays the scale information corresponding to each level of the service layer.
[Top/Bottom/Move one layer up/down one layer] Click the
menu on the right side of the service node and select Top/Bottom/Move one layer up/down one layer, which will affect the stacking order of service resources in the map or scene.[Attribute Query] Click the
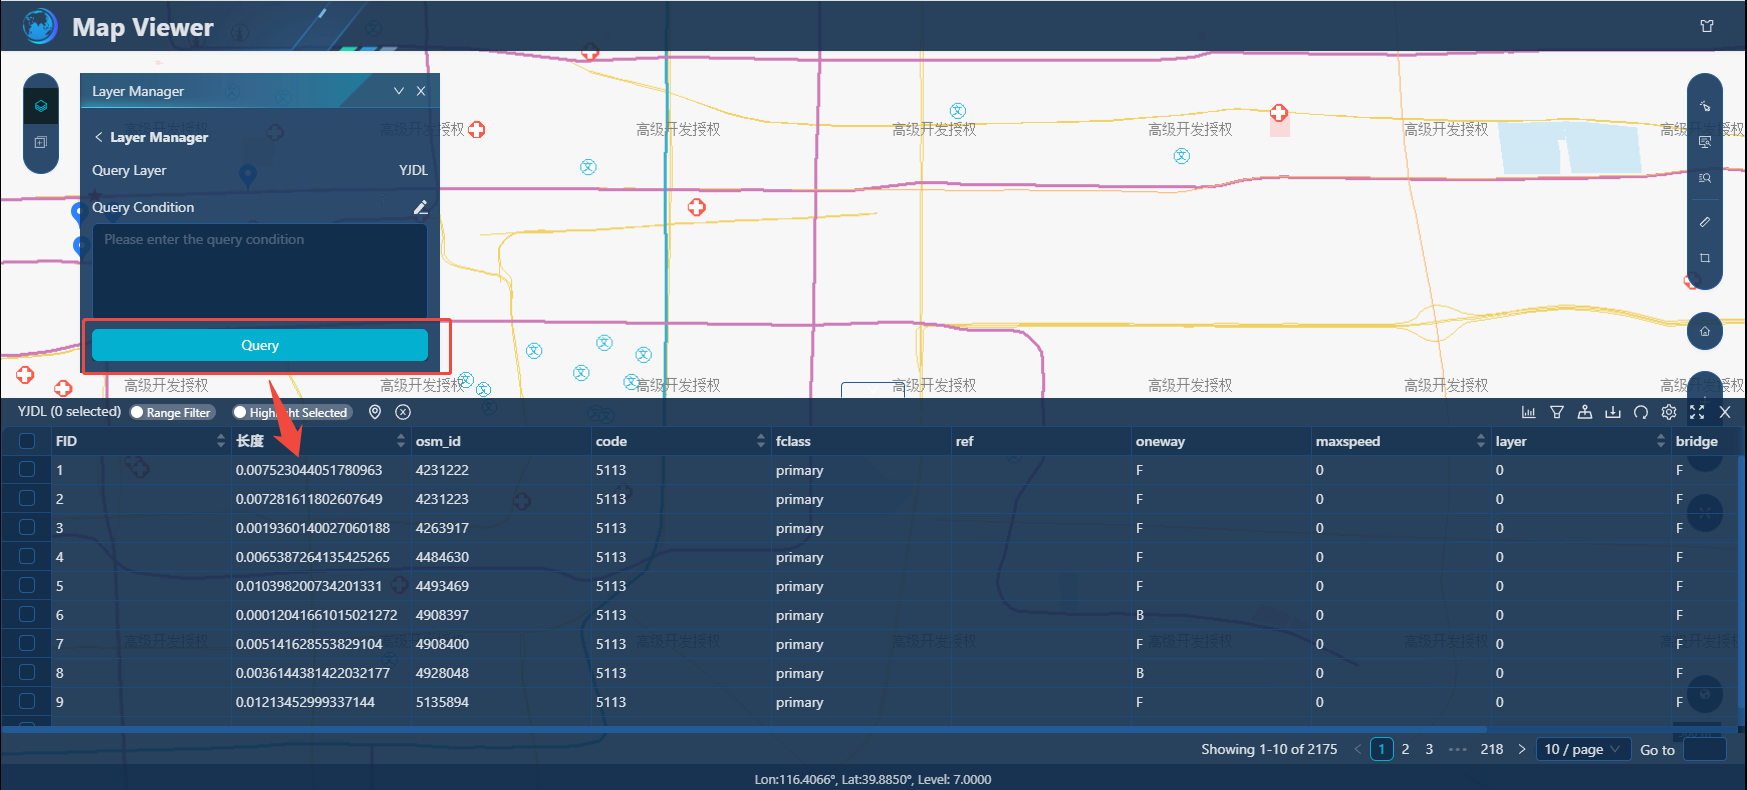
menu on the right side of the layer under the service node to pop up the attribute query panel, you can directly click "Query" to pop up the attribute table to query all the attribute information of this layer;
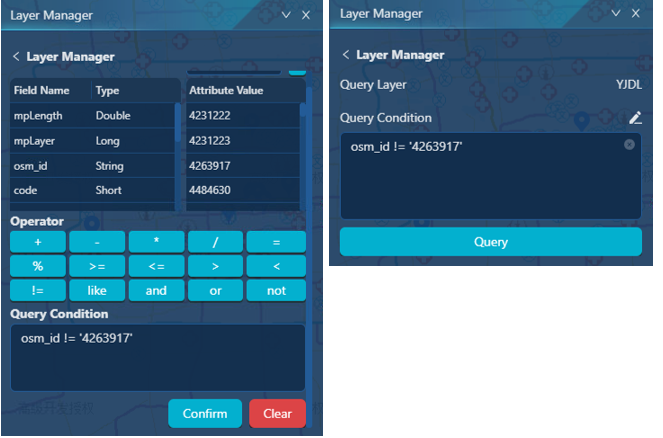
Users can select fields as needed through the custom query panel, and the deduplicated attribute values of the field will be displayed in the field information box, and then with the "Operators" panel, select fields, field values, and operators through mouse clicks, combine them into standardized GSQL conditional statements, and then click "Confirm" to query. For users who are familiar with GSQL, you can manually enter it in the Enter Query Criteria box. Querying for eligible results will be displayed in the Result Set panel.
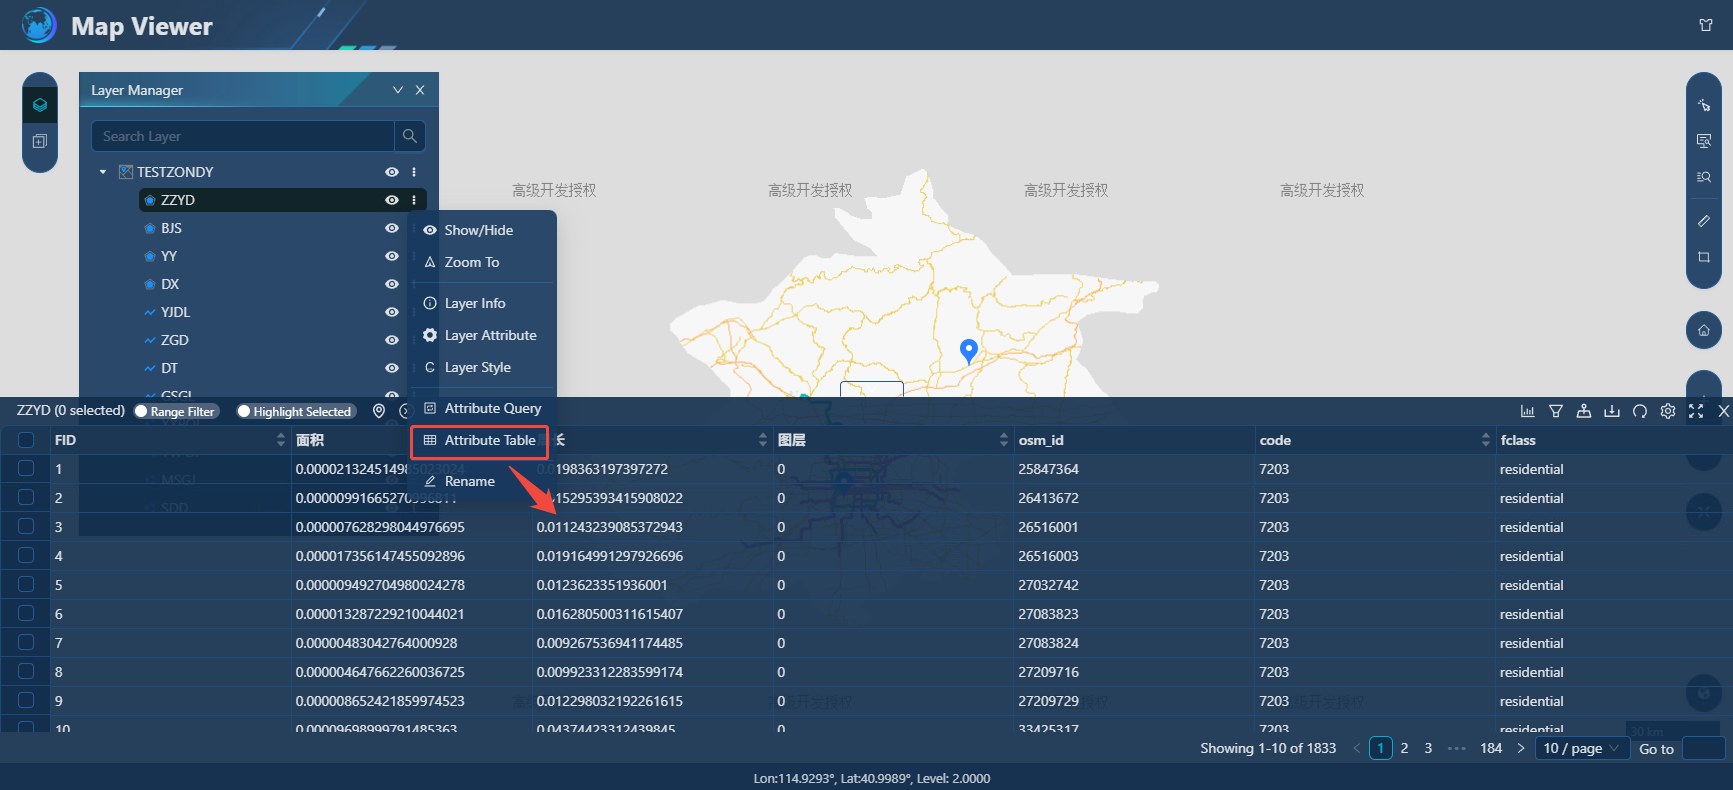
- [Attribute Table] Click the menu on the right side of the layer under the service node, click "Attribute Table" to view the layer attributes, and the query results will be displayed in the result set panel in a table. Click the row to locate to the feature, and double-click to zoom to the feature.
[Layer Style] You can directly configure thematic services for layers. After successful configuration, the corresponding thematic expression can be displayed based on the layer style parameters, and the thematic map types supported by the point/line/zone layer include three types: unified, Unique Value, and Classified. Click the
menu on the right side of the layer under the service node, and click "Layer Style" to adjust it synchronously in the pop-up edit box until it meets the user's needs.unified, unified thematic map uses a single symbolic information configuration layer to configure all elements in the layer, which is mainly used to emphasize the distribution characteristics of the data. Unified thematic map effect:
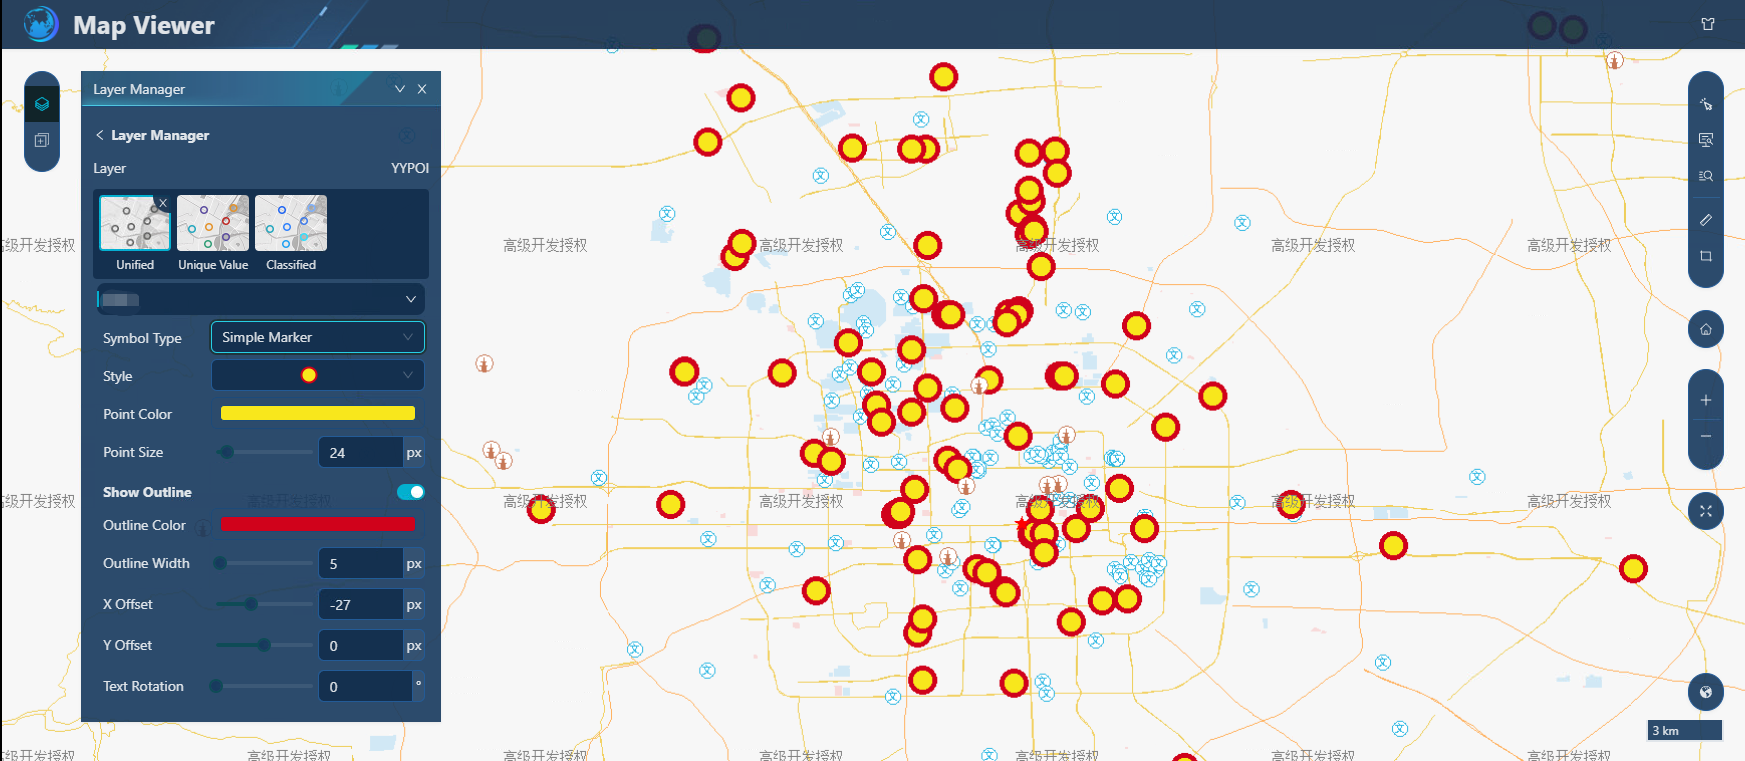
- Unique Value, single-value thematic map is classified according to a certain attribute field of a feature, and an attribute value is used as a category to be filled with different colors or patterns. The following figure shows a traditional single-value thematic map created based on the feature name field:
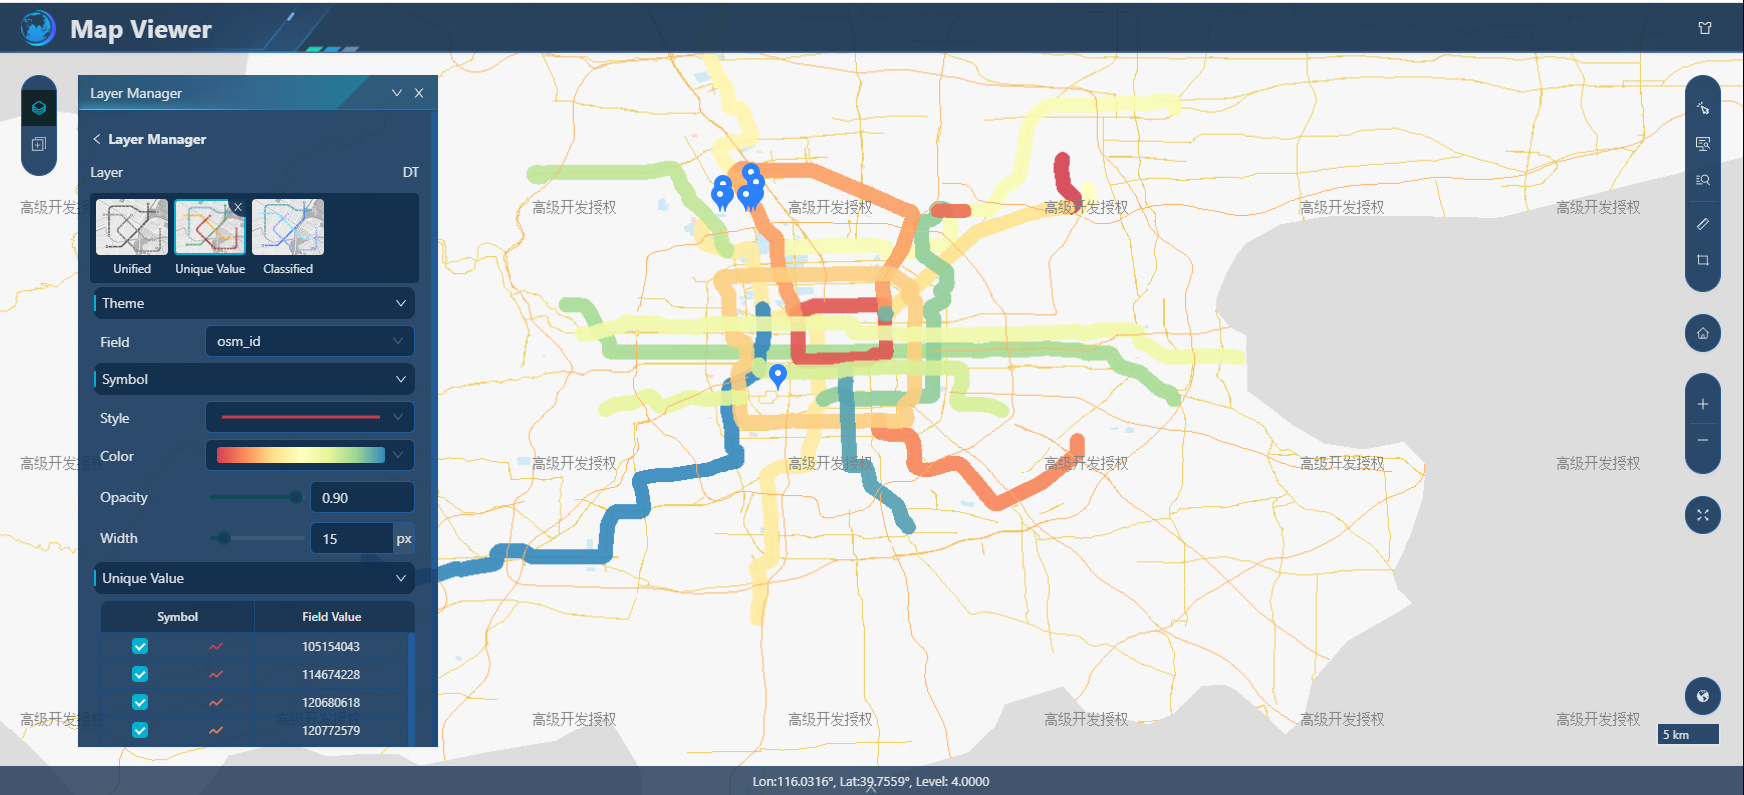
- Classified, the segmented thematic map is divided into several levels according to a certain grading method according to the attribute values of the elements, and different colors or patterns are used to represent different levels. Each level represents a range of values, thus reflecting the quantitative differences in mapping features. As shown below:
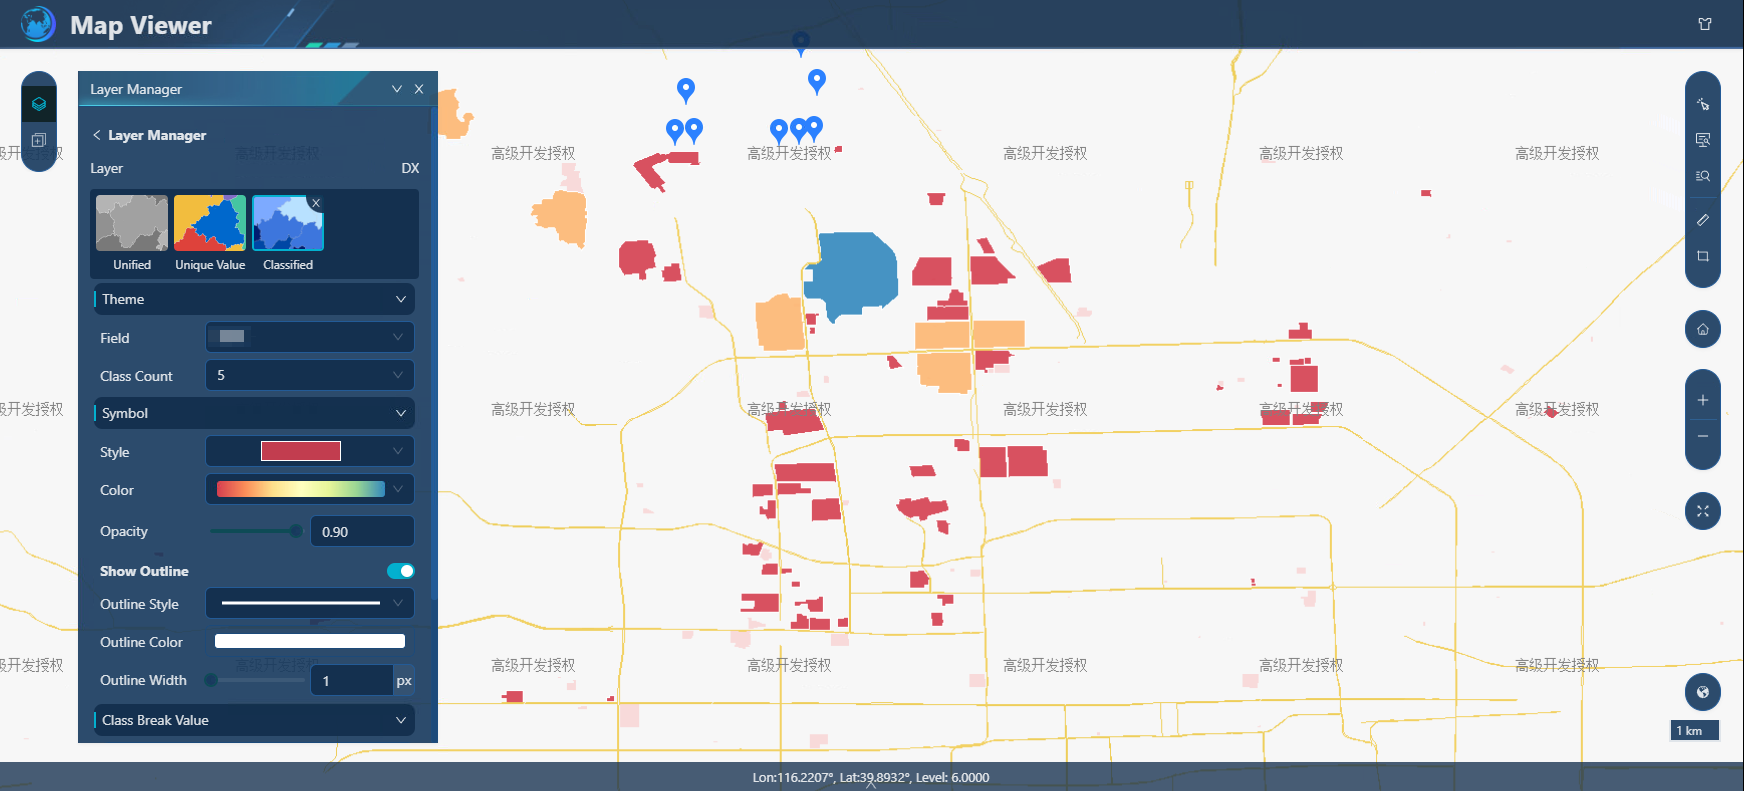
- [Rename]: Click the menu on the right side of the service/layer of the layer management, click "Rename", you can re-enter the name of the current service/layer to confirm.
- [Delete]: Click the menu on the right side of the layer management service/layer and click "Delete" to delete the current service, and the service will not be displayed after deletion.
3. IGServer service preview The "Layer Management" application also supports tile service, image service, OGCWMS service, OGCWMTS service, ArcGIS map service and ArcGIS vector tile service.
Add data
Function description
By adding data modules directly to the service preview front-end, various map services are added to the front-end for display. The following table describes the types of services that can be added when using different display engines
| Type of service | Leaflet | MapboxGL | Cesium |
|---|---|---|---|
| Map service | √ | √ | √ |
| Grid tile service | √ | √ | √ |
| element services | √ | √ | √ |
| Vector tile service | √ | √ | √ |
| Video services | √ | √ | √ |
| Scenario service | × | × | √ |
| M3D service | × | × | √ |
| Terrain caching service | × | × | √ |
| 3DTiles service | × | × | √ |
| WMS services | √ | √ | √ |
| WFS services | √ | √ | √ |
| WMTS services | √ | √ | √ |
| WCS service | √ | √ | √ |
| ArcGIS Map Service | √ | √ | √ |
| ArcGIS Element Service | √ | √ | √ |
| ArcGIS vector tile service | √ | √ | √ |
| Type of service | Service addres | Example |
|---|---|---|
| Map service | http(s)://<server>:<port>/igs/rest/services/<serviceName>/MapServer | http://127.0.0.1:8089/igs/rest/services/Beijing/MapServer |
Operating instructions
1. Click "Preview" to enter the "Map Viewer" preview interface.
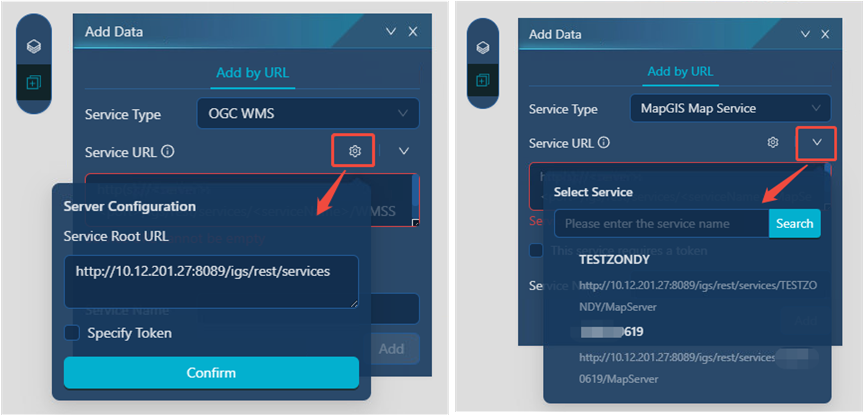
2. Enter the menu panel through the tool bar key on the upper left side, click "Add Data" to enter the Add Data function panel;
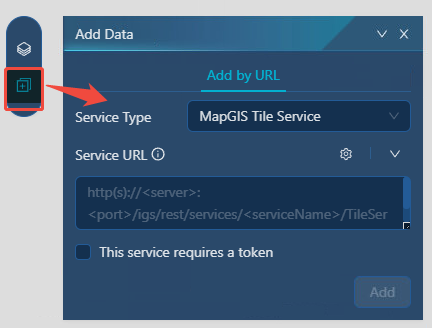
- [Service Type]: Select the corresponding service type according to the required services, such as map service, tile service, OGC service, etc.
- [Service URL]: You can directly enter the service base address into the text box or select the corresponding service by configuring the server root address by dropping down.
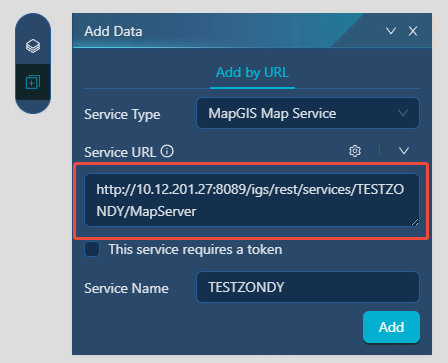
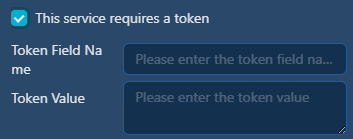
- Token required to access this service: When the service has enabled a token, you need to check the box to enter the corresponding token parameters and service data to be added to the service normally.
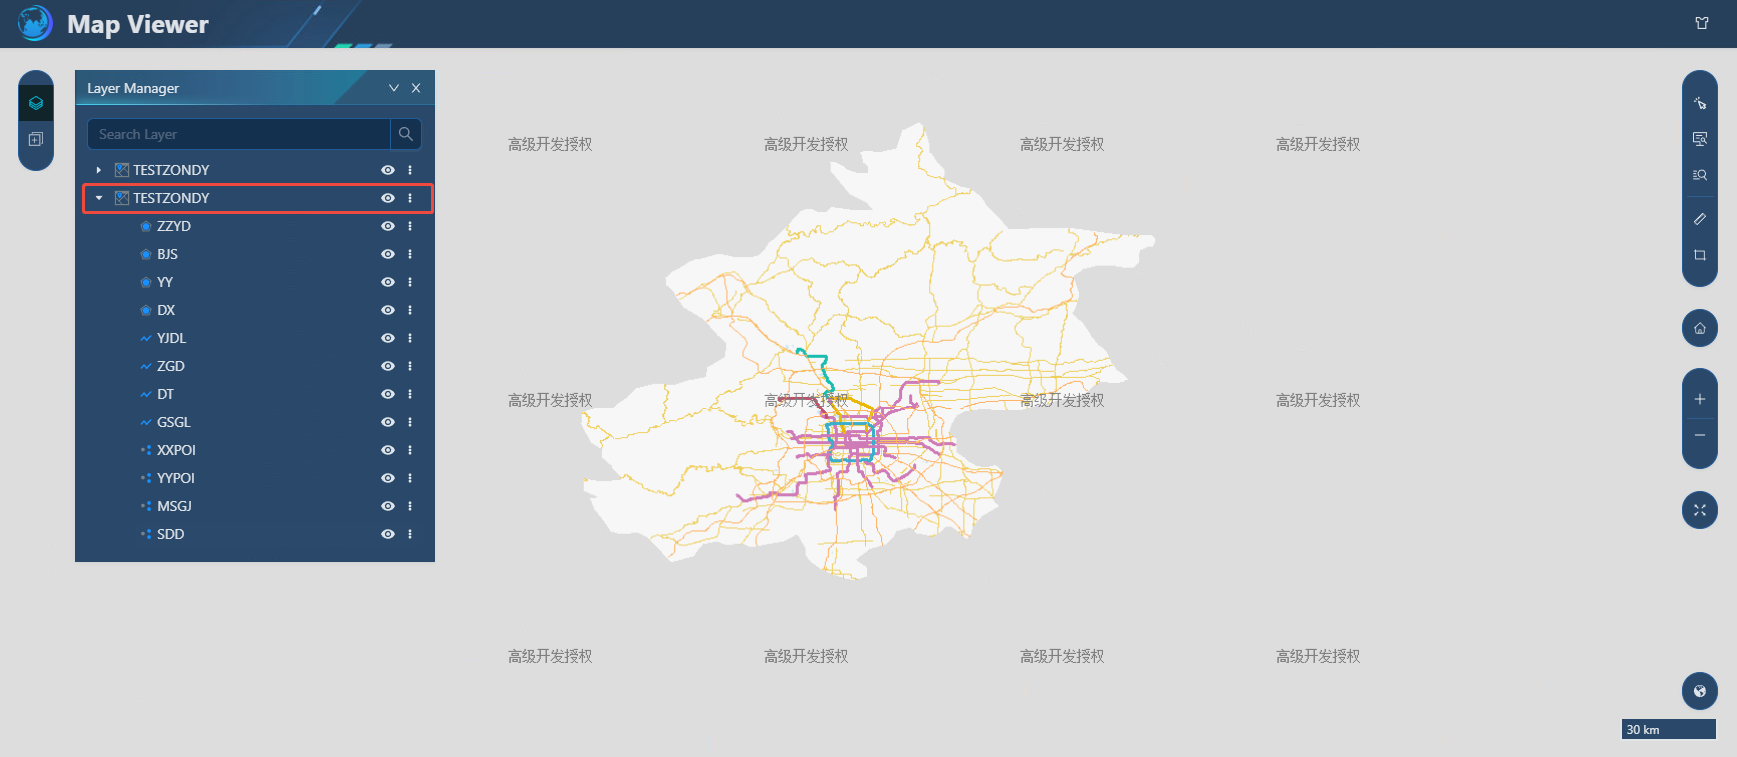
2. After the data is successfully added, it can be overlaid in layer management and supports related application functions.
Tips:
The cesium display engine is displayed under the EPSG4326 coordinate system by default, so the service data under the Lambert projection coordinate system will be deformed after projection when the cesium engine is displayed, so please use it with caution.